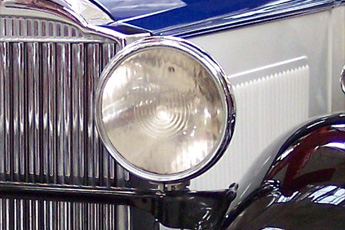
Headlight wiring poses a quandary for many restorers, and the decision point seems to hinge on whether you intend to drive your restored car at night. Simply put, for most of automotive history, headlights weren’t nearly as good as we’re used to in our modern cars. If you plan to drive your restored classic at night, you’re likely to miss the safety and confidence you get with new headlights.
I don’t mean to say that you need to put HID Xenon lights on your 1949 Mercury, but there are several discreet upgrades that you can make that will give you better light. You’ll trade off a few concours points, however, so it’s good to understand the tradeoff before you begin.
Most cars manufactured in the classic period use a 6-volt electrical system. These headlights are simply dimmer than 12-volt lights. You can optimize the lighting in a strict restoration by replacing your wiring and making sure your ground points are all working to their best advantage. See the related articles on wiring harnesses and keeping your generator and voltage regulator working in top condition if you want to stay all original.
If you choose to convert your car to 12-volt operation, you’ll need to replace all your light bulbs (inside and out) and potentially have some of your gauges rebuilt to handle the increased power. You’ll also replace your generator and voltage regulator, starter, and your ignition coil. It’s a big job, but you’ll be rewarded with better lights and more authoritative starting.
If you’re not committed to authentic restored wiring, another way to improve your headlight operation is to put a relay on your headlight circuit. In many older applications, all the current necessary to operate the headlights runs through the headlight switch. That can be a weak point in the circuit, and it’s a lot of power to run through a touch-contact point.
A relay is a simple device - you can run a fat wire from the battery or other power pickup point straight to the headlights, interrupted by the relay positioned anywhere along that wire. Then you run a thin positive wire to your dash switch, and then from the switch to the relay and then on to ground.
A small amount of current goes through the switch wire and when you turn the switch on, all that current has to do is close an electromagnetic connection in the relay, and that connection completes the circuit on the fat wire from the battery to the headlights. Presto! You’ve got good current flow to the lights and you’re not frying your dashboard switch. If you’ve got a weak headlight, consider this modification to bring it back to full function. You can usually hide the relays and use period-correct wires to mask your upgrade somewhat.
Even if you keep all your stock wiring, you can still get bulbs that fit in your stock headlights that will offer you more light than your car had originally. Period-correct fog lights or driving lights can also help you see in the dark without losing points with the show judges.
Your car’s tail lights, marker lights, and turn signals are not nearly as tough on your switches and wiring as your headlights. You can relay these if you like, but it’s generally not necessary. Simply make sure that the sockets are clean and the wiring is renewed to get these functioning as designed. Bear in mind that your turn signal flasher (if your car is so-equipped) should also be replaced with a period-correct original. A modern flasher may work, but you can lose points there. Flashers are also made in 6-volt and 12-volt models, so be sure to replace that if you change your car’s voltage. Finally, don’t forget your license plate light, trunk light, and under-hood light. Details matter!
Above all, make sure that your grounds are good. That’s the single worst offender for non-functional or partially functional lights on a restoration.
|
 |
DO |
- Consider discreetly relaying your headlight wires
- Take special care to make sure your lighting grounds are good
- Replace old and dangerous wiring
- Use the best bulbs you can find
|
 |
DON’T |
- Don’t use an obviously modern flasher on an otherwise original restoration
- Don’t run large amounts of current through a dashboard switch
- Don’t neglect your minor lights, even if the bulbs are hard to find
|
|
|
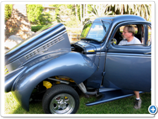
There were a couple of problems with the lighting on Popular Restorations feature car. Under the hood, the insulation had crumbled off of the headlight wiring, and the taillight sockets were all but worn out.
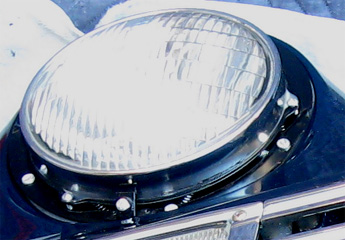
To fully restore the lighting I took the headlight and taillight housings apart and had them powder coated to prevent and future rusting. In the taillight housings I installed new lamp sockets that had a spade-type ground terminal so they could be properly grounded. And rewiring the entire car took care of all of the bare wiring issues.
Steele Rubber had the headlight housing gaskets and the rubber seals that go between the taillight fixtures and the rear fenders. They did not have some of the small gaskets that go between the lenses and the lamp fixtures but those are easily made from neoprene sheet stock -- I bought mine at Amazon.
|
|
|
Don Gibson
211 SE 11th Avenue
Portland, OR 97214
503-231-4100
PR: When people are restoring headlights and taillights, the starting points they’re working with are all over the place -from nonexistent to weak to pretty good. How do you approach a lighting restoration?
DG: If someone wants a full rotisserie restoration and wants a 100-point car - completely authentic - there lies the challenge. When we’re talking about wiring, though, there are so many different ways to go, because this is 2010 and things have progressed so much, even since the 60s.
PR: What’s different now?
DG: Things have been updated and upgraded so many times. But if a guy wants to stay original, we have just those systems on the car that are all authentic, with no additional circuit protection, no big-amp alternator -nothing changes. But on the other hand, you can do a resto-mod and make it a better driver. So out goes all the cloth-covered wiring, and I fabricate a harness and fuse box, circuit protection and replace the devices.
PR: If someone asks for a nice restoration, but they also want to drive their car, do you recommend a 6-volt to 12-volt conversion to improve the lighting? Except for obvious things like the battery, can that be done discreetly?
DG: Well, then you don’t have a 100-point car. If the judge knows what he’s looking for, he’ll notice those things. But it certainly makes a lot more sense to go with 12 volts. It cures a lot of woes.
PR: Do you have to change headlight wiring for a 6 to 12-volt conversion?
DG: 6-volt systems had higher amperage, so the wire was bigger. So if you convert to 12 volts, everything’s great, but the insulation is still coming off the wires. Then again, back in the 30s, 40s, 50s, and even the 60s, they weren’t big on circuit protection. They didn’t have a lot of fuses, so the whole system is simpler. It really depends on what the customer’s desire is for how you’re going to do it and what products and materials you’re going to use.
PR: Back in the day, engineers designed cars to last maybe 10 years. What’s that old wiring like today?
DG: Cloth-covered wiring doesn’t last very long. Its lifespan is maybe 20-25 years. So now it’s coming apart and there’s no insulation.
PR: For a car in the 1960s, when they didn’t use cloth-covered wires any more, do you still automatically replace the wiring for a 100 point restoration?
DG: No, never. That’s a last ditch thing that’s done. I try to work with what’s there to keep people within their budget. To take the harness out of any car and replace it is going to be an expensive venture. The older the car, the easier it might be, but if the system is workable, I’ll always try to work with what’s they’ve got first, unless it’s a complete tragedy.
PR: How do you deal with cut wiring? What should a restorer do about that?
DG: Usually your wiring is your roadmap. It will tell you what someone was trying to accomplish. But when it changes from the OE format, that’s when the red flag should go up. Usually they were trying to install some aftermarket device. But we usually try to return things to their OE format because the engineers tested everything and made sure it would work.
PR: How do you do that restoration?
DG: We try to get as many butt connectors out of there as we can, and if we do have open wires, we terminate and insulate them so they don’t become a future problem.
PR: Do you have a preferred method for making wiring connections?
DG: It depends on the circuit, the device, and the location. Often times, a well-insulated butt connector on the proper gauge wire is really OK. But abrasion protection often comes into play, so you use split wrap or some other protection. There are times when soldering is the only way to do it so you don’t get a wire that looks like a snake that swallowed a mouse. A lot of times I use an awful lot of uninsulated butt connectors with shrink wrap over those. There’s all sorts of products out there, but I like the seamless barrel butt connectors. I’m real particular about those. I also use shrink wrap with glue in it, because it bonds to the vinyl coating on the wire and it makes it strong.
PR: Any final thoughts?
DG: Take lots of pictures! If people aren’t real clear about what they’re doing, having pictures will really help you put the car back together. For example, you may have a wire that you don’t know where it goes, but it turns out to be your back-seat courtesy light. We also save all the wiring until the restoration is done. Keeping the old stuff is paramount.
|
| Click on any item below for more details at Amazon.com |
|

|
|
Jim Horner
Automotive Electrical Handbook
HP Trade, Paperback, 1987-01-01 |
|
This is the fundamental book on automotive wiring and electrical systems. All the bases are covered here for restoration or custom work. If you need to completely rewire a car, this is the book to have.
|
|
Tony Candela
Automotive Wiring and Electrical Systems
S-A Design, Paperback, 2009-04-15 |
|
This book covers the basics of electrical principles and describes the required tools and equipment. It is your essential guide for such tasks as wiring a hot rod from scratch, modifying muscle car electrical circuits for cooling fans and/or power windows, or adding a premium stereo and other conveniences to modern performance cars.
|
|
Matt Strong
Custom Auto Wiring & Electrical HP1545: OEM Electrical Systems, Premade & Custom Wiring Kits, & Car Audio Installationsfor Street Rods, Muscle Cars, Race Cars, Trucks & Restorations
HP Trade, Paperback, 2009-04-07 |
|
This book covers electrical theory, wiring techniques and equipment, custom wiring harnesses for racing, hot rods and restorations, pre-made wiring harnesses, special electrical systems (navigational, audio, video), troubleshooting common electrical problems, dashboards and instrument, and trailer wiring.
|

|
Haynes
Haynes' Automotive Electrical Manual
Thomson Delmar Learning, Paperback, 1999-01-15 |
|
A complete guide to electrical system troubleshooting, repair, maintenance and rewiring. Clear step-by-step instructions and hundreds of photos show you how to do a professional job yourself.
|
|
|
|