Your classic car’s clutch is an important restoration item, but it is often not given the same attention as the engine to which it is attached. Yet a faulty clutch will leave you stranded by the side of the road as surely as a carburetor or ignition failure. So a little extra attention paid up front can save you a tow truck ride of grief later.
By the end of the 1950s, most cars sold in the United States featured automatic transmissions of one type or another, but older cars, sports cars, many muscle cars, and trucks are likely to use manual transmissions that utilize a driver-actuated clutch to control power delivery from the engine.
Clutch Types
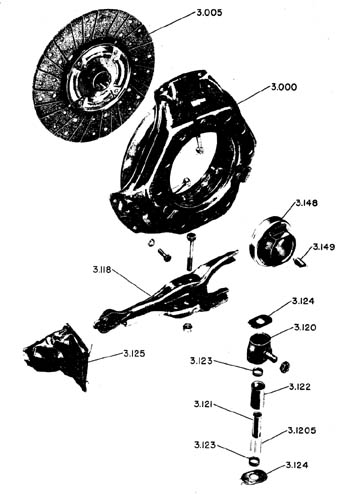
Among antique (pre-1918) cars, there are a wide variety of clutch designs. But these quickly standardized on the durable and effective driven disc (also known as a clutch disc) and pressure plate (also known as a clutch cover) design. In this design, the engine’s flywheel and the pressure plate are attached to the crankshaft, while the clutch disc is sandwiched between the pressure plate and flywheel, and connected to the transmission’s input shaft. Squeezing pressure from the pressure plate grabs the clutch disc and the spinning flywheel transfers momentum to the transmission.
Simple enough, but there are several components in this system that benefit from restoration and even improvement. Because the clutch assembly is not visible in a running car, this is an ideal place for a bit of modern improvement over older designs and materials while retaining the authentic method of operation.
Mechanical vs. Hydraulic Actuation
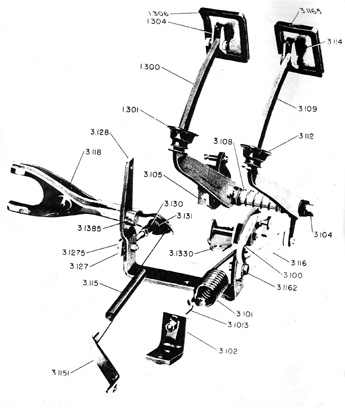
The most basic difference found among clutches is whether the driver actuates the clutch through mechanical action such as a rod or cable or through a hydraulic system. Mechanical clutch actuation systems were in use through the 1960s, and cable-actuated clutches are still in use today. If you have a mechanical clutch actuation, it is generally a simple arrangement, easily evaluated and restored. Simply replace the cable or check the rod for structural integrity.
Hydraulic clutches are more complex, having several components that require maintenance and which must seal properly to function. Those components and their issues are listed below.
Master Cylinder
The clutch master cylinder is generally found on the engine side of the firewall, or sometimes below the car’s floorboards. The master cylinder has two parts - a hydraulic fluid reservoir and a hydraulic cylinder. This hydraulic cylinder is generally connected to the clutch pedal by an actuating rod. When you step on the clutch, the rod pushes a sealed piston in the master cylinder, forcing hydraulic fluid down a tube to transfer motion to the clutch slave cylinder.
To restore a master cylinder, you must ensure that the piston in the cylinder seals well and that the cylinder walls are free from scoring and pitting. Also, you must ensure that the connection to the clutch pedal is within specified bounds for freeplay. Over time, the clevis pins and other mechanical connections to your pedal can wear out of specification.
Master cylinder restoration generally involves honing the cylinder until it is smooth, and replacing the rubber (or leather) skirts that seal the piston in the cylinder. Check all connections to the pedal and finally, check the reservoir and its seals to the cylinder for cleanliness and cracks.
Slave Cylinder
Next, check and restore the hydraulic line that connects your master cylinder to the clutch slave cylinder. This is generally a carefully-bent metal tube, and older lines tend to develop cracks. If your tube is cracked, worn out, or fails to seal at the ends, you can purchase pre-bent tubes from many vendors, or purchase a tubing bender and a length of straight tubing and bend your own.
 |
|
Warning... |
|
Don’t try to bend tubing without the proper tools. You will kink the tube and ruin it every time.
|
At the other end of the hydraulic line from the master cylinder, you will find the slave cylinder. This is simply another hydraulic cylinder with another piston that pushes a rod or other device that physically actuates the clutch. Instead of a fluid reservoir, the slave cylinder features a bleed valve that allows you to let air out of the system.
Restoring a slave cylinder involves the same process as a master cylinder. The interior of the cylinder must be honed smooth and the seals on the piston replaced. Then when the system is reconnected, use the bleed valve to let out air so that only hydraulic fluid remains.
About Hydraulic Fluid
Originally, hydraulic fluid was simply Castor bean oil - the brand name “Castrol” derives from that history. Modern hydraulic fluids (generally sold as brake fluid) are a complex formula that may contain natural or synthetic oils, glycol, silicone, and other ingredients.
Choosing a brand of hydraulic fluid is difficult because there is a lot of controversy over the “right” fluid to use. Various articles have been written about swelling seals and disintegrating rubber if the wrong fluid is used, but the best information right now is this:
- Most classic cars were originally designed to use DOT3-type fluid.
- New DOT5 fluid is not likely to hurt your seals if you’ve freshly restored your hydraulics.
The major issue is that DOT3 and DOT4 fluids absorb water and that lowers their boiling points and can cause rust in your hydraulic systems, especially if your car sits idle through the winter. DOT5 fluid is made from silicone, which does not absorb water.
Throw-Out Bearing
If you have restored your clutch hydraulics, the next place to work is the throw-out bearing. The plan is simple here - Replace it. Throw-out bearings are generally inexpensive to buy, but expensive to replace due to the extreme labor involved in getting to them, so it makes sense to replace this part any time you’re working on the clutch.
Pressure Plate: Coil Springs vs. Diaphragm Springs
The two most common designs for pressure plates (also called clutch covers) over the years have relied on coil springs or diaphragm springs to provide the squeezing pressure that clamps your clutch disc. In general, older pressure plates that used coil springs are called “lever” designs, and newer designs use a flat spring assembly called a “diaphragm” clutch.
With a coil spring plate, when you step on the clutch pedal, the throw-out bearing is pressed against one end of a set of levers that pull the pressure plate surface away from the clutch disc. You’re working against the coil springs, and the effort needed to depress the clutch is constant, or rises as your foot presses down. Plus, as your clutch disc wears down, the coil springs are less compressed when your clutch is clamping. This reduces clamping force and makes it harder to press your clutch pedal down.
In a diaphragm design, the clutch has an initial resistance and then goes easily to the floor and more clamping force exerted than in lever designs when you release the clutch. Most drivers prefer diaphragm clutches, but if you care about absolute authenticity, you can generally find the original clutch design for your car.
|
|
Warning... |
|
Don’t choose a high-strength pressure plate unless your engine is built for it. Every time you step on the clutch, you’re pushing your crankshaft towards the front of the engine with hundreds of pounds of pressure. This puts wear on your thrust bearings, and a high-strength performance pressure plate may be too much for your engine.
|
Clutch Discs
Clutch discs are generally made with a friction material riveted and/or glued to a metal disc, with a splined center designed to fit on the input shaft of the transmission. The most common design uses a separate center section sandwiched around the driven disc, with small coil springs mounted sideways to take up rotational forces as you engage the clutch.
This is nothing you need to be overly concerned with, except to understand that this “springiness” aids you in smooth starts by providing a little more flexibility in the system. Older clutch discs as well as competition discs may not have this design - the splined center may be hard-mounted to the driven disc. Such clutches require more skill and finesse to use smoothly.
The friction material in clutch discs used to be made from asbestos, but is now made of fibrous materials such as Kevlar and resin. Some clutch discs use ceramic materials, sintered metal, or exotic materials like carbon fiber. For most restorations, standard clutch material is perfectly adequate.