|
No matter how good a job you do on the car’s exterior, a truly complete restoration has to include a show-quality engine bay. Your car’s engine bay is its beautiful smile, so don’t neglect regular trips to the dentist!
In addition to its status as one of your car’s most important visual presentations, the engine bay is also one of the most difficult areas to restore properly. Even the prettiest engine bay can also be the place where a concours restoration can lose points.
The challenge when you’re restoring your engine bay is to make it both beautiful and correct for your car. That’s hard because engines are where previous owners are most likely to have discarded original parts and made deadly hacks into the stock components.
The best possible case when you begin a restoration is that you have a low-mileage barn find car that has never been touched by anyone but a factory-trained dealership mechanic. The dream is to find a car in which very single wire, every hose clamp, and every sticker is just as it was when the car was new, and simply old and faded. It goes without saying that such examples are beyond rare.
But let’s say you have found such a diamond in the rough and you’re ready to dive in and start your engine bay work. You’ve got your tools laid out and you’re all ready to go. For best results, follow these steps:
Step 1: Stop now, before you ruin everything! Just put the wrenches down and step away from the car. You’ve got some homework to do - maybe a week’s worth. I’m not kidding. What you’ve got, assuming it’s as original as you think, is a Rosetta Stone to the factory-original layout of your car. The success of others, as well as your own restoration, may depend on what you do next.
Step 2: Carefully document everything in your engine bay. That means photos, sketches, schematics, and notes on the layout, routing and orientation of all wires, tubes, hoses, parts, fasteners, and labels. Don’t be afraid to ask for help and have a friend point to items of interest while you’re taking pictures. If your car is rare enough that replacement stickers aren’t available, look into carefully removing yours and scanning them or photographing them in detail so that reproductions can be made.
Step 3: As much as possible, follow the rules for general restoration disassembly and carefully note and file all your parts and pieces. Resist the urge to believe that you’ll remember where pieces go, and resist the urge to throw away anything at this point. You just never know what you’re going to need later. Take more pictures as you expose new parts and hidden areas.
Step 4: When you’ve got things apart, follow the usual restoration steps and clean everything as much as possible. Then you can decide if you need to take your engine bay down to bare metal for repair and paint. Luckily, engine bays in many (if not most) classic cars are painted black regardless of the body color of the car. Black paint hides oily grime, however, so thorough cleaning is important.
 |
|
Hint... |
|
Hot water takes off greasy grime better than any cleanser combined with cold water. The hotter your water, the easier your job. You can usually rent pressure washers that use an extra kerosene tank to heat your water almost to boiling before it gets sprayed. You’ll be amazed at how the yuck comes off!
|
Step 5: When your engine bay is painted, you can start the restoration and reassembly of all your components. Replace every hose with a new one as a matter of principle, but if your wiring is in good condition, you can clean it and use it again. Let your conscience be your guide.
Step 6: When your engine and transmission are done, and the car’s body is back on its frame -whenever this happens in your restoration process -find some old blankets or other protection for your pristine engine bay and get your final reassembly done. Your engine should come back from the rebuilder painted in factory-correct colors, but if it’s bare, take the time to paint it right when it’s out of the car. Also, pay attention to items like your radiator fan and pulleys, as these were sometimes painted in different colors from the engine and the bay.
Step 7: If you have been able to find replacement stickers, put those on last of all. Pop-riveted or screwed-on plates can go back on at this time, too.
That’s the procedure if you’re starting with a perfect example. But what about the vast majority of us who start with a typical car? The one that’s missing a bunch of parts, has a bunch of extra wire spliced into it, and generally looks like it’s been home to a badger for the last 10 years is a far greater challenge.
Here’s a set of strategy points for tackling that job:
- Fall back on your usual resources for information -your marque club, similar cars at shows and concours, Internet resources, and restoration guides. Sometimes you’ll need to get several opinions, and it’s not even certain that there’s only one right answer. Many classic cars are handmade and unique.
- Simple is usually best. If you’re wrong, someone will eventually tell you and a simple implementation is easier to redo correctly than something complicated.
- Take your time and find the right parts. Swap meets are less and less useful every year, but still valuable. Ebay and other Internet parts sources have taken much of the merchandise that used to be available at swap meets, but on the other hand, Internet sites give you access to stuff that would have been at swap meets far away from your home.
- Pay attention as you disassemble your engine bay - original panel colors are often hidden behind stickers, plates, and painted-over components.
Pay attention to detail and do your homework and you’ll be rewarded with a car you’re proud to show off with the hood up. You’ll also get a car that runs better and is easier to fix in the future if you do your engine bay right the first time.
|
 |
DO |
- Take photographs of everything, from every angle around the engine.
- Attend car shows or a concours in your area and take pictures of engine compartments from your make and model of car.
- Be extra careful with fresh paint. Tape can pull fresh paint loose, and installation slips can mar your finish.
- Be careful reinstalling windshield wipers. Make sure that the wiper motor is in the parked position before installing wiper arms and blades. If the wipers hit the cowl, they can do serious damage!
|
 |
DON’T |
- Don’t remove a single screw until you’ve taken numerous photographs from every possible angle. You may think you’ll remember the way it was, but you won’t.
- Don’t throw anything away until you’re absolutely done. Keep every piece of wire, every fastener, every piece of rubber weatherstripping. You never know what you might need.
|
|
|
For the Popular Restorations feature car, the engine bay restoration was easy because the car was completely disassembled.
While in pieces, I took the front fender wells to the powder coater. Along with the fasteners for the rest of the car, I had all of the engine-bay nuts and bolts cadmium plated. If anything was difficult, it was reassembling the fender wells after a year had passed. For most cars this would be trivial but the Packard’s fender wells consist of four pieces of sheet metal on each side. Looking at eight pieces of sheet metal and considering all the permutations, including rotations and reflections, was a bit daunting.
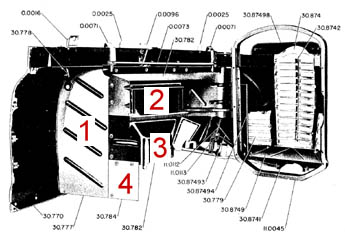
Thankfully, I had some pictures and the diagram shown above as a guide. And the parts manual indicated what size bolts go where. But getting all of the sheet metal bolt holes to line up required some patience.
I painted the engine Packard Engine Green using spray paint from Bill Hirsh Auto. To prep the engine I used naval jelly rust remover, sprayed it with brake cleaner, and then primed it with self-etching primer.
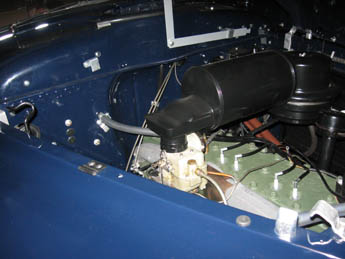
To refresh the fuel line, the oil lines, and the vacuum advance line, I used naval jelly to remove the rust, buffed them with a cloth buffing wheel, and then sprayed them with clear lacquer. And similarly for the brass fittings except no naval jelly.
As with the fender wells, I had the air cleaner and oil filter canister powder coated. And also the oil filler cap.
Happily, the firewall required no work as that was painted with the rest of the body. However, I did replace the rubber bumpers and weather stripping at the top of the firewall as well as those on the tops of the fenders where the hood rests.
|
|
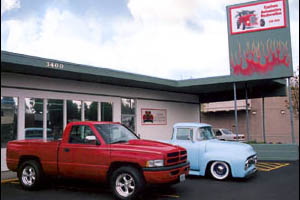
Don Hawkins and Chris Veenstra
3400 SE 122nd Avenue
Portland, OR 97236
503.230.7970
www.customautomotive.com
PR: How do you go about restoring an engine bay? Where do you start?
CAR: It depends on how we receive it. Sometimes it’s bare steel, and sometimes we’ve got an engine and all the wiring still in place.
PR: Suppose it’s complete?
CAR: We start by assessing what it looks like. If the inner fender wells are rusty, we’ll sand those and put a sealer coat on them. Same with the outer fender wells and the firewall. We’ll put sealer on those and then paint them with original equipment black or depending on what the customer wants, we can paint them in body color or anything the customer wants.
PR: Do you take photos and notes to maintain originality?
CAR: Absolutely. A lot of the work we do here, the customers want it all original. If we’re doing a 100-point or 1,000-point car, we need to know exactly how the wires run, what kind of wiring it is. It’s right down to whether it’s a Goodyear or a Gates hose, and the exact OEM clamps that hold the hoses on. We research a lot and try to figure out what needs to be done to make it original. We’ll bring the engine back up to what it looked like when it rolled off the factory floor.
It’s not at all uncommon to take 100 photographs of the engine compartment. We’ll note the length of wires, how a wire droops in a particular situation, what kind of tape was used, and how is it wrapped. Everything is taken into account.
PR: Once you’ve got the metal and the paint taken care of, do you restore or replace wiring and hoses?
CAR: We assess what they look like. If they need to be replaced, we’ll replace them. If we can make them look new again by cleaning up or restoring them, we can do that. A lot depends on whether it’s cloth covered or a plastic-covered wire, and also whether sunlight, gasoline, or heat has gotten to it. If we can re-use it, we will. A lot also depends on the customer -does he want all new wiring, and does it have to look stock? A lot of cars have exact reproduction wires being made. Sometimes the ends aren’t available any more, so we save those and clean them and re-use them.
PR: How do you approach dressing the engine?
CAR: Say we’re starting from the ground up. We’ll paint the engine block the factory color and source all the necessary parts. It’s hard to get some of the original paints, but we can duplicate any paint code. We’ll look up the right kind of bolts to use. Sometimes we’ll clean and plate the original fasteners and re-use those.
PR: How about ancillary components like voltage regulators and other parts? Do you clean them up and re-use them, or do you replace them as a matter of course?
CAR: It depends on the customer and the results he’s looking for. Any of those components can be rebuilt. There are good people in town who do that. If it’s a muscle car, all those parts are still available.
PR: For really old cars, such as from the brass era, there are parts that aren’t available. How do you deal with that?
CAR: Brass pieces can be duplicated if we have an example. If necessary, we can have a replacement part cast locally. We also have a fabrication department that can fix or duplicate what we need, or make a part look new again. Many more parts are available now than were available even just 10 years ago, because restoration is so popular now. We were able to find a brand new original voltage regulator still in the box, sealed with wax, for a 1940 Ford Sedan Delivery.
PR: What if parts are missing?
CAR: If a part isn’t available, say a spare tire retaining bracket, we can duplicate a part in our fabrication department. Thanks to the Internet, if we can find a photograph, we can duplicate a part.
|
| Click on any item below for more details at Amazon.com |
|

|
|
David H Jacobs Jr
Ultimate Auto Detailing Projects
Motorbooks, Paperback, 2003-09 |
|
This book covers detailing in a series of easy projects, such as using a clay bar, cleaning wire or mag wheels, trunk detailing, and so on. The book is divided into chapters based on the area detailed, such as “Under the Hood” or “Tires and Wheels” and includes many photos and detailed instructions for a solid detail job.
|
|
|
Buzzle.com has information on engine bay restoration and also includes a book that this fellow has written on the topic!
PalmierConcepts.com is the purchase site for the above-mentioned book.
FordMuscle.com has an article on how to restore an engine bay with the engine in place.
MotoringInvestments.com has some Mercedes engine bay restoration photos.
|
|
|