|
Almost every restorer has to deal with body rust. It’s a fact of life in this hobby. If you’re one of the rare people who doesn’t need to read this article, just count your blessings and move on, but I’m confident that you’ll be back--sooner or later.
Rust is simply the oxidization of iron-based metals. Mild steel is the construction material for almost all car bodies (fiberglass Corvettes, plastic Reliants, and some nice aluminum-bodied cars such as the Alfa Romeo GTA are the exceptions), and mild steel is subject to rust. Depending on the particular composition of the metal used, rust can begin in minutes on any surface exposed to air! A few European automakers in the 1960s and 1970s, purchased their steel from the Soviet Union. That steel had inconsistent composition and as a result, rusts worse than other alloys.
When you begin your bodywork restoration, it’s important to know where to look for rust. You need to check anywhere that water can get into the bodywork and pool. That means checking the rocker areas immediately behind the wheels, the bottoms of doors and fenders, and around the windshield and rear window. Areas around marker lights and taillights are also common rust spots. Inside the car, especially with convertibles, check the floorpans in the driver and passenger footwell and under the front seat(s).
If your car ever lived -even for one winter in a state where they salt the roads in the winter, it’s nearly certain that you’ve got rust. Also, if your car ever lived at the coast, you’ll have salt poisoning and rust.
Rust is often obscured when a car is prepped for resale, so if you can see the rust on yours, at least you know it’s there. A freshly painted car -especially a cheap paint job -often hides rust that will bubble up within a year.
So, what are your options when it comes to fixing rust? There are products that allow you to cover over rust, and putties and fiberglass filler for holes, but in my opinions, there’s only one truly correct solution for a quality restoration: get rid of the rusty metal and replace it.
I believe there’s a place for the POR-15 products when it comes to painting clean metal, and I use plastic body filler like everyone else to smooth minor imperfections. But when it comes to a hole in metal, I’m a purist. And the restoration industry generally makes it easy to do the repair the right way.
Replacement body panels are available for commonly-rusty areas on a wide variety of domestic cars. If you’ve got a Ford Model A, 50s Chevy, or 60s Mustang, you just pick the panels you need out of a catalog. They simply weld in where you’ve cut out the rusty metal. If you’ve got a rare car, or rust in an unusual place, with a little hammer work and a bending brake you can make quality replacement pieces to weld into place.
In my book Automotive Welding: A Practical Guide, which is available through this site, I detail the procedure for cutting and shaping custom replacement panels and welding up smaller holes. Your local community college likely has courses in bodyworking that will give you the hands-on experience you need. And if you don’t feel like hammering your own metal, it simply doesn’t cost that much more to have your car fixed right -at least, not if the rust is limited to the usual areas. A serious rustbucket can get expensive!
When you’re cutting and shaping pieces, keep in mind that patience is your friend. Get your pieces to fit just right, because once you’ve welded them into place, it’s much harder to fix a cockeyed belt line or sill.
The final thing to remember is to be sure you’ve eliminated all the rust. Older cars actually have an advantage here, because the bodies are comparatively simple compared to a later unibody design. With a unibody, you might need to cut into your box sections to “biopsy” the metal in there for rust. Once you’re sure you’ve eliminated rust from your world, you can weld in new metal, hammer out your dents, smooth it all over with a little body putty, protect the backside with POR-15, and then send it out for paint.
|
 |
DO |
- Look carefully throughout the car for rust. You don’t want to find out you missed a spot after you’ve paid for paint!
- Fix rust properly. You can hide rust for a little while, but it always comes back worse later
- Consider learning to weld and shape sheet metal body parts. It’s a satisfying skill
- Protect all metal against future rust with paint or protectant
|
 |
DON’T |
- Don’t convince yourself that a little bit of rust is nothing to worry about
- Don’t paint over active rust in a quality restoration with any product
- Don’t use body putty or Bondo to fill a rust hole larger than a pinhole
|
|
|
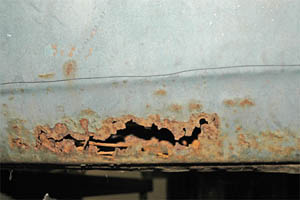
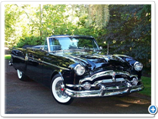
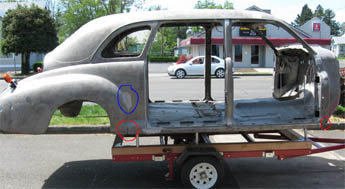
The Popular Restorations feature car was advertised as having only “surface rust” and upon examination that seemed to be true. There was obviously a little rust in the trunk pan and a few pinholes that needed to be filled.
When I went around to a few paint shops to get price estimates, I found they all wanted the car media blasted or dipped. After the paint removal I was to bring the car directly to them so they could treat the bare metal to prevent it from rusting until they could work on it.
When asking for rough estimates I told the shop owners the car had surface rust with a few small holes, some small dents on one fender, and that the rear doors stuck out too far on the bottom. Their prices ran from $4,000 to $20,000, the latter being definite show quality. I ended up choosing a shop in the $7000-$9000 range because they were recommended by a friend and their paint jobs showed almost no orange peel.
When the time came, I took the body to a walnut shell blaster. The doors, front fenders, hood, and trunk lid went to the dipper.
The red circles show rust spots not visible before blasting and the blue circle is factory lead filler
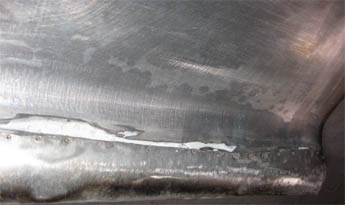
Bottoms of doors had patch panels the were removed and repaired correctly
With regard to protecting areas from rust using POR-15, I found it to be great for undercarriage parts. I have even used it on the reverse side of the window moldings and anywhere else that doesn’t show but needs protection. I did have trouble with it running on curved surfaces though. For example, the Packard has a long tube-shaped shock absorber that goes from left to right over the rear axle. Even with a single thin coat, the paint would slowly sag to the bottom before drying. And of course there is all of the preparation -- first the Marine Clean and then the Metal Ready -- before applying the POR-15 itself.
|
|
Mark Spurlock
www.aandmdeluxecustoms.com
1134 N. Fremont Lane
Cornelius, OR 97113
Telephone: 503-992-1988
PR: How do you approach a rusty restoration project?
MS: There are a number of ways to approach preparing the metal. You can use media blasting with sand, soda, walnut shell or plastic or glass beads, and there’s dipping. Then before we dissect the car, we make an extensive repair list. Then sometimes you can get restoration parts and sometimes you can’t. We can hand-make about any part out there. We have more metal shaping equipment and machines than most shops.
PR: How do you make custom parts?
MS: Sometimes we’ll make a patch panel that mimics what’s there before we cut the old one out. Then we’ve got a part that fits about 90%. Sometimes when we cut the outer layer out, we find that the inner layers have problems. Then we keep digging until we can remove all the rust and make the new patches accordingly. Then we work inside-out, to make the inner structure right, then do the outer skin.
PR: What if there’s too much rust to take a pattern?
MS: Then you’ve got to wing it, or make a pattern off the other side and transfer it as a mirror image. If both sides are really bad, or the part is complicated with body lines or compound curves, then you have to wing it or find a similar car to take a model from.
PR: How big can a rust hole be before you need a patch panel?
MS: Plastic filler or POR15 should never be used for repairs. It should only be used to smooth minor cosmetic blemishes. That’s light waves, dimples, scratches, and divots you can’t get to. But you should not use those to cover any kind of hole, from screw holes to rust holes or any hole.
PR: What if people just want a “good enough” fix for a daily driver. Does that change what you do?
MS: No, and we do that kind of work all the time for people. We recently worked on a job like that, and we made a new panel that went over the original panels, and we removed the affected areas, and then used rust converter behind the panels and this 3M waxy product that seals the area against future moisture.
PR: What about pinholes?
MS: As you know, if you’ve got pinholes then you’ve also got rust in other places. So you need to take all the paint off and go through and inspect every divot and dark spot and see if you can push through it. You have to do the repair right, or you’ll get a bunch more pinholes popping out in a short time.
|
| Click on any item below for more details at Amazon.com |
|

|
|
Jeffrey Zurschmeide, Russell Nyberg
Automotive Welding: A Practical Guide
S-A Design, Paperback, 2009-05-15 |
|
This book was written by our contributor, Jeff Zurschmede. Besides being informative and comprehensive it is extremely well organized and illustrated. The following topics are presented in a straightforward manner with plenty of color photos: the kinds of welding and metalworking available, the tools required to perform welding tasks, the types of welders available, basic welding techniques, grinding and cutting, various forms of sheetmetal work, frame repair and reinforcement, filling body holes and rust repair, tube-steel projects, and more.
|
|
Dennis W. Parks
The Complete Guide to Auto Body Repair
Motorbooks, Paperback, 2008-08-15 |
|
In The Complete Guide to Auto Body Repair, Dennis Parks shows you the tools, materials, and techniques that will successfully get you through the bodywork process, repairing damage from collisions, neglect, and rust.
Dennis Parks has also written How to Build a Hot Rod, How to Plate, Polish, and Chrome, How to Restore and Customize Auto Upholstery and Interiors, and How to Paint Your Car.
|
|
Eddie Paul
Sheet Metal Fabrication: Techniques and Tips for Beginners and Pros
Motorbooks, Paperback, 2008-03-15 |
|
In this book, Eddie Paul gives readers the means to mold their own sheet metal creations. Topic covered include the necessary tools and how to use them; how to choose, prepare and work with the right material; how to make forms and mock-ups, and much more.
|
|
Jim Richardson
Pro Paint & Body
HP Trade, Paperback, 2002-09-03 |
|
This is another well-reviewed guide to professional paint and bodywork. It includes information on bodywork tools, materials and techniques. A partial list of subjects includes: Assessing a project car and damaged bodywork, disassembly and stripping, basic hammer and dolly techniques, diagnosing dents, fillers, leading, spray guns, current paint technology, color coats, color sanding, and custom colors.
|
|
Martin Thaddeus
How to Restore Classic Car Bodywork
Veloce Publishing, Paperback, 2004-09-27 |
|
This book goes into detail about all facets of body and frame metalwork, with detailed, photo-rich procedures for such tasks as wheel arch and door sill repair. Hammer and dolly, pick and file techniques are explained and illustrated. This book does not cover paint prep or mechanical issues - this is strictly “panel beating.” This book was written and published in Britain for a British audience, but is perfectly applicable to American restorations.
|
|
|
If you are considering using POR-15 take a look at the information at their website www.por15.com.
|
|
|