|
Your car’s ignition system is also part of the general engine electrical system. These components are simple, but their adjustment is critical for your car to run at all; and if they are misadjusted, you can damage or destroy your engine entirely.
Your ignition electrical system includes a distributor, ignition coil, high-tension (high voltage) spark plug wires, and spark plugs. We’ll start at the ignition coil. This is usually a sealed cylinder with positive and negative wiring connections, and a central high-tension insulated wire that connects to the distributor. You connect 6 or 12 volts of positive DC current to the positive connector on the coil, and the negative pole connects to the distributor body. Inside the distributor of most vintage cars, you will find a condenser, which is a small capacitor, and a set of contact points that ride on a set of cam lobes on the distributor’s central shaft.
The distributor shaft is driven in time with the engine’s cams, usually by a gear on the cam. The shaft rotates and moves a rotor around in a circle. The rotation opens and closes the contact points, completing a circuit each time the points close. As the circuit is completed, the coil sends a surge of high voltage current down its wire to the distributor cap. At that moment, the rotor is pointed to one (or two) of the spark plug wire connections, and the current runs down the plug wire to the center electrode of the spark plug. The current must jump the gap between the center electrode and the body of the plug, which is grounded in your cylinder head.
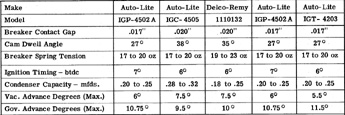
If you think about it, several things are necessary for your ignition system to make your engine run. The distributor must be rotated in the correct position for the rotor to point at the correct distributor cap plug wire at just the right time for the spark. The points must be adjusted to the right setting so that the open and closed periods (called “dwell”) are long enough to fill and discharge the coil, and the discharge must happen at the right time. Both the coil and condenser must be in good working order to store enough electricity to make a spark at the moment it’s needed. And you need to have 12 volts of current at the coil to provide power. Finally, you don’t want too much resistance in your spark plug wires, and you want the correct gap between your spark plug electrode and its body to get a good strong spark.
Ignition system restoration is mostly a process of replacing parts. The only component you can or should plan to restore is the distributor body itself. The condenser, points, cap and rotor, plug wires, plugs, and coil are all replaceable parts with limited lifespans.
To restore your distributor, there are a couple key points. First, this is not something you can generally do yourself. But when selecting a shop to perform the restoration, you want to make sure that they test the distributor shaft bearings. A wobbly shaft creates variability in your distributor timing, so those bearings need to be replaced. The other item to check is the cam lobes that drive your contact points. These lobes can wear over time, and if they are not as high as they used to be, your point dwell will be incorrect.
Unless you’re going for a completely original restoration, worm cam lobes are not the end of your original distributor. Products like the Pertronix Ignitor allow you to slip a magnetic collar over the distributor shaft cam lobes and replace the points with a magnetic receiver. The system also removes the condenser, but all the modern components are hidden underneath the stock distributor cap. The only clue that you’ve upgraded is that two wires will connect your distributor to both the positive and negative poles of the coil.
 |
|
Hint... |
|
One of the more difficult ignition problems to diagnose on your own is coil weakness. Often, a weak coil will run the engine in a satisfactory way under most conditions, but the ignition system will stumble on heavy acceleration. This is often mistaken for a carburetion problem, but what’s happening is that the increased pressure in the cylinders at wide open throttle is making it harder for the spark to jump the plug gap. The solution is to replace the coil with a new or increased voltage capacity, and also replace the spark plug wires if they are old and may be suffering from increased internal resistance.
|
The good news is that if you replace the consumable parts and have your classic distributor rebushed, and upgrade to an electronic ignition module, your ignition system restoration should last for many years without further attention.
|
 |
DO |
- Replace all your consumable ignition parts during your restoration
- Have your distributor checked for shaft wobble and worn lobes by an expert
- Consider upgrading to an electronic ignition module if you plan to drive your restoration regularly
|
 |
DON’T |
- Don’t assume that an ignition component is OK because it seems to be working
- Don’t set point gap or plug gap by estimating. You need a feeler gauge to do it right
- Don’t trust that your coil is OK because the engine starts and runs
|
|
|
The ignition system can be one the easiest parts of a total restoration. At least that’s the way it was with the Popular Restorations feature car. I bought a tune-up kit (cap, rotor, points, and condenser), new ignition cables, and a set of plugs from Max Merritt Auto. The parts were manufactured by Autolite and cost $75, $45, and $24 respectively. I didn’t replace the coil but I did take the distributor apart and added new lubrication (The distributor has a lubrication reservoir with a threaded cap that you can turn periodically to force more lubrication into the distributor shaft bushings.)
I adjusted the plugs and points and did an initial timing by turning the distributor body backwards until the points just opened (while the vibration damper was at 6 degrees before top dead center). I didn’t bother doing the timing with a light because I planned on taking the car to a shop to have the dwell and timing set, as well as having them check the vacuum and centrifugal advance and the air/fuel mixture.
Before I got the car to the shop I noticed it had a miss. It seemed more like fuel than an ignition problem. But it turned out that one of the spark-plug-wire ends was bad. With that replaced, the car runs strong and smooth.
|
|
Jeff Schlemmer, Proprietor
1149 Quincy Street
Shakopee, MN 55379
(612)-804-5543
www.advanceddistributors.com
PR: When people go to restore their classic car’s distributor, they often just clean it up and put on a fresh cap, points, rotor, and so on. Is that enough?
JS: What most people think of as a home rebuild is no more than cleaning it and reassembling it with the same parts. They don’t have an accurate way of testing the advance curve or even knowing what the advance curve should be. You can buy recurve kits for domestic cars, but there’s no cut and dried answer for recurving. The one thing I’ve got is the time spent and the effort spent to find the ideal advance curves for a lot of cars.
PR: Take us through the restoration process?
JS: We start with an evaluation of the distributor, as it’s received. This includes a quick check to verify all parts are present, the vacuum advance functions as required, and the mechanical advance is functional (or not.) Normally the distributor is spun up to speed on a Sun distributor tester to verify its current state of function, as long as its sent assembled as it came out of the car.
PR: So, to properly test the distributor, you need that special testing tool?
JS: Yes, absolutely. Next we disassemble the distributor and degrease it in an ultrasonic parts washer. The parts are cleaned in a water-based solution to be as environmentally friendly as possible, at high temperature to speed the process. Once the parts are degreased, they are blasted with clean glass bead to remove any corrosion and to give a like-new appearance.
From there, many parts are sent off to plating (we trade out parts on an exchange basis here to save time). Other parts are polished or simply painted with clear engine paint to prevent corrosion if the plating build-up may be an issue.
PR: Shaft wobble is a big problem in old distributors. Do you check for that and repair it?
JS: Only after the parts are cleaned can you accurately measure any discrepancies that would cause inconsistent or inaccurate operation. Worn or damaged parts are repaired or replaced at this stage from our inventory of new and used parts, as required. What happens with distributors is that the pressure of the points spring pushes the shaft in one direction all the time, so over a long period the bushings are worn in an ovalized pattern and the shaft wobbles. This can make timing erratic and even cause timing in one cylinder to be different than the others. Most timing lights just check one cylinder’s timing, but we check all of them.
PR: Then you put it all back together?
JS: All the parts are hand-fit, taking the time to eliminate end play in the advance assembly, make sure the advance weight stops are accurately placed, and adjust the length of the stop arm that determines the total amount of advance the distributor offers. The shaft is straightened to well under one-thousandth of an inch run out, so the lift on each point lobe will be equal. New advance springs are installed in every distributor rebuilt here. Every distributor is also recurved for optimal performance, using the data provided by either the car’s owner, or the shop performing the installation.
PR: What’s your opinion about aftermarket electronic kits such as the Pertronix?
JS: Honestly, an electronic ignition kit will not gain you anything over a good set of points. It does give you a fixed dwell, so if your distributor is worn you will see a performance improvement, but that’s because it’s masking a physical problem with your distributor.
PR: But a Pertronix is a “set it and forget it” - isn’t that worth something?
JS: Yes, you no longer have to adjust point gap and dwell, and you don’t have to worry about the condenser failing. Pertronix gets an unfair reputation for failures, and that’s not their fault. It’s cars with bad ground straps on the engines, the wrong coil, or something else causing the failure. Those are the common things we see all the time.
PR: How about your ignition coil? Should that be replaced?
JS: Those coil windings pay the price over time. Copper wire only lasts so long. If there was any corrosion on the wire before it was immersed in the oil, that corrosion will grow.
PR: Anything else to say?
JS: Leave no stone unturned, and don’t make any assumptions that things that seem good really are good. A lot of products on the market today are bad right out of the box. Don’t ignore anything as being a possibility. I can’t count how many brand new distributors I see that will not run reliably.
to do a basic set of parts. It depends on the amount of damage and the number of pieces. I work by time and materials, so just a dashboard might be $800 or $900, or it could be $2500 for a big sedan with 21 pieces. If there’s extra work it’s more, but if there’s less, then it’s less. It’s hard to put a price on it, but I can generally give people a target before we start. I’ll also help people who want to buy a kit and do it themselves, because that’s just how I like to do business.
PR: Do you have any other advice for a prospective restorer?
LM: I would say two things - first, a total restoration is going to cost more money than you ever imagined, so be prepared for that. The second thing is to do buy a car that’s already done and research who did it. If a guy just wants an old car, they should just buy one that’s already done because they’ll never recoup their costs. I’ve done a lot of restorations and I’m amazed at the time and work it takes. And never buy a car to restore that’s in parts. If you’re going to do it yourself, buy one complete and get a parts car, too, if you can. Sometimes you can sell the extra parts for more than you paid for the parts car.
|
| Click on any item below for more details at Amazon.com |
|

|
|
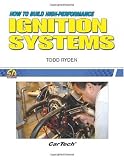
Todd Ryden
How to Build High-Performance Ignition Systems
S-A Design, Paperback, 2008-01-21 |
This well-reviewed book is a complete guide to understanding automotive ignition systems, from old-school points and condensers to modern computer-controlled distributorless systems. Author Todd Ryden leads you through the various components, systems, and subsystems, explaining the theory behind how the parts work with each other to achieve the ultimate goal of efficient combustion. Includes 275 color photos and wiring diagrams.
|
|
|
David N. Wenner
Petersen's Basic Ignition and Electrical Systems
Green Hill Pub, Paperback, 1977-11 |
|
This is the classic work for understanding older automotive electrical systems and components. With chapters on ignition and generators and starters, it’s all covered in detail in this book. Plus, this book was written long enough ago that things like points and DC generators are covered in detail - down to the level of brush replacement and reassembly.
|
|
Jim Horner
Automotive Electrical Handbook
HP Trade, Paperback, 1987-01-01 |
|
This is the fundamental book on automotive wiring and electrical systems. All the bases are covered here for restoration or custom work. If you need to completely rewire a car, this is the book to have.
|

|
Haynes
Haynes' Automotive Electrical Manual
Thomson Delmar Learning, Paperback, 1999-01-15 |
|
A complete guide to electrical system troubleshooting, repair, maintenance and rewiring. Clear step-by-step instructions and hundreds of photos show you how to do a professional job yourself.
|
|
Tracy Martin
How to Diagnose and Repair Automotive Electrical Systems
Motorbooks, Paperback, 2005-11-10 |
|
Tracy Martin, an ASE (Automotive Service Excellence) Certified Master Technician, explains the principles behind automotive electrical systems and how they work. Several hands-on projects take readers on a guided tour of their vehicle’s electrical system and demonstrate how to fix specific problems.
|
|
William B. Ribbens
Understanding Automotive Electronics
Society of Automotive Engineers Inc, Paperback, 2003-01 |
|
This illustrated how-to guide helps readers understand how electronic circuits and devices run important parts in automobiles. It explains how electronics affect engine performance, fuel economy, and emissions, and describes the role of electronics in speed control, ride control, and anti-lock braking.
|

|
Sunpro
Actron CP7605 Dwell Tachometer Voltmeter Analyzer
|
|
Reads dwell and tachometer ranges on all conventional automotive ignition systems excluding coil on-plug. Tests points on the breaker-point ignition systems. Comes with large, easy-to-read analog meter.
|

|
Actron
Actron CP7528 Advance Timing Light
|
|
Heat resistant over molding on battery clips with one touch control. Linear xenon flash tube and focused fresnel lens provides light bright enough for use in broad daylight. Will work with 6 volt negative or positive ground.
|
|
|
|