Buying the right car is critical, and having the right tools is absolutely required. But no less important is having a good space in which to work. If your workspace is bad, you simply cannot do good work.
The most common failing is that the workspace is too crowded. You’ll be tempted to stack things on your project car, or things may fall on the car and damage it. A nice, large space makes life easier (I like 1000 square feet per car), but many top notch restorations/rods have been done in a cramped, one-car garage.
Other common ailments of project space include leaky roofs, dirt floors that allow moisture to wick up through the earth, and poor lighting. In a pinch, you can rent clean, dry, well-lit workshop space, and sometimes the extra expense helps motivate you to complete your project. But recognize that this is a tradeoff against the convenience of an attached garage.
You need to be comfortable in the workshop. Having heat in your shop can be as simple as a propane-based radiant heater, but be cautious about working with flammable products in proximity to open flame.
You will also want to implement some form of critter control. Mice and rats like workshops because they’re unoccupied for hours and days at a time, and you’re likely to find that animals have taken up residence in your painstakingly restored car interior in a surprisingly short time!
Dealing With an Oily Floor
Most garages have oil and grease-stains on the floor. You can clean these up with a little work. A good way to clean a greasy, oily floor is with kerosene or paint thinner. Pour some out and brush it around with a broom. Then throw some kitty litter on it to soak it up. You’ll have to experiment to find the best litter in your area. You want the old fashioned kind, not the “clumping” kind. If you buy “grease sweep” from an auto parts store you will be paying too much for the same stuff. Don’t throw it away. Put it in a 5 gallon bucket. You’ll be using it later.
Make a Paint Booth
A separate area for painting components is nice. Paint dust (wet and dry) will permeate the shop and settle on everything. An isolated paint area barrier can be created with drop cloths or shower curtains. You can improvise using some ½” PVC pipe suspended from the ceiling and shower curtain hangers so you can easily open and close the barrier.
 |
|
Warning... |
|
Do some research before setting up your own paint booth. Improper ventilation or sparks from tools or appliances can cause respiratory problems, asphyxiation, or an explosion!
|
Storage Bins
Every restoration project needs cupboards or shelves (or a vacant room in the house) for storing finished components that won’t be installed for awhile. Some of these will sit for a long time and you want them looking fresh a year after they’re done. If all you have are shelves, then staple a sheet or a drop cloth in front of them to keep the dust out.
Get a couple dozen each of different sized “Ziploc” freezer bags with the white marking areas on them. You will use these to store and identify parts, nuts/bolts, and components when you remove them from the car. Discipline in this area will make your life easier when you go to reassemble things. It’s helpful not only knowing what bolts you’ll be using to put something back together but also knowing exactly what size new bolt you may need to buy. Use a “Sharpie” to write details on the bags, such as where the parts came from (e.g. “trim clips, RF fender spear”). You can also stick notes in the bags detailing specifics about the part. Note down anything that will help you remember whatever you need to know about that part. Don’t rely on your memory!
Plastic storage tubs make great places to keep parts that are too big to put in a Ziploc bag, and they’re stackable. Identify them with a Sharpie using masking tape or adhesive labels.
Of course, the old standbys; butter tubs, coffee cans, mason jars, and so on still work well for small stuff.
|
 |
DO |
- Keep your space clean. This is really important. It doesn’t have to be surgically clean, but the cleaner the better. It will get repeatedly dirty throughout the restoration, but stay on top of it
- Designate one area (preferably outside) as the dirty zone. That’s where you’ll do scraping and cleaning of parts and other tasks that are likely to get dirt and crud all over the place
- Buy or make a clean, sturdy bench for assembly of components. Light it well with a 48-inch fluorescent fixture
|
 |
DON’T |
- Don’t neglect to note details on your storage containers. Later on, you’ll wish you had done it
- Don’t try to work in a space without adequate lighting. Little parts fly off and go all over the place, and finding them in the dark is just about impossible
|
|
|
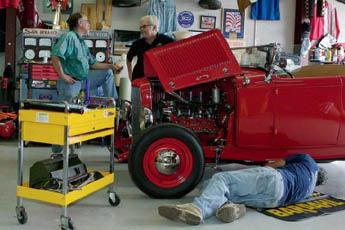
Disassembly Space
The Popular Restorations feature car was disassembled at a facility that rents indoor restoration areas. The space available was about 15 by 30 feet and this proved adequate for the initial disassembly. But a full double car garage is would have been better.

Keeping the Floor Clean
If you are doing your first restoration, be prepared for the disassembly to create a big mess. Removing parts from the car or cleaning them with a scraper or wire brush will cause black, greasy particles to go flying several feet in every direction. If you are doing the disassembly in your home garage, the particles will get compressed onto the floor as you step on them and then tracked into the house later. Instead, lay down a tarp on the floor that is bigger than your vehicle and that extends to your workbench. Use a pair of shoes that you remove whenever you leave the covered area.
Assembly Space
The assembly for the 1946 Packard was done in a double garage. Special workspace preparation that was done includes the purchase of an engine lift, a compressor, a parts cleaner, the installation of multiple workbenches and a ceiling mounted retractable extension cord.
Workbenches
With regard to the workbenches, you can make a very sturdy 2’ X 8’ to 2’ X 12’ bench with storage underneath for about $100. Start by buying a 24” X 48” X 72” Gorilla Rack at Home Depot.
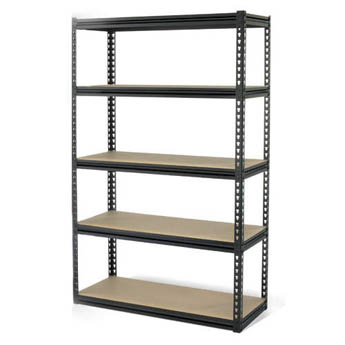
The 72” high Gorilla Rack is really two 36” racks. Build each 36” rack as a pedestal for the left and right of the bench. If you have space, place the pedestals a few feet apart so there is a sitting area in between. Otherwise, screw the pedestals together using machine screws. The top can be plywood over a 2” X 2” frame, designed so that the frame sets down around the edges of the Gorilla Racks. Screw the back edge of the workbench to the wall for additional support.
For a square work table, screw the Gorilla Racks together with the 48” sides touching and make a square wood top to cover it.
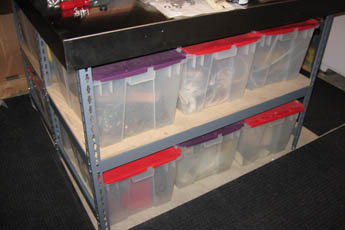
The Gorilla Racks will hold 12 plastic bins (as pictured.) The bins are a great way to store auto parts and supplies, and even medium sized tools during your restoration.
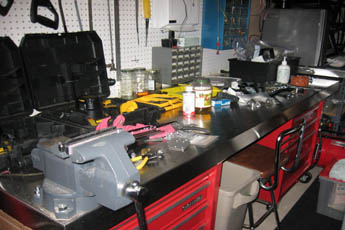
If you can afford a little more, have a sheet metal shop make metal tops for your benches out of galvanized sheet metal or stainless steel. Specify the edges are to be turned down and welded at the corners. Then glue the metal top over your existing bench with a cement such as Liquid Nails.
For a few hundred more dollars, you can have a large amount of additional tool storage by replacing the Gorilla Rack pedestals with Craftsman Mobile Tool Cabinets.
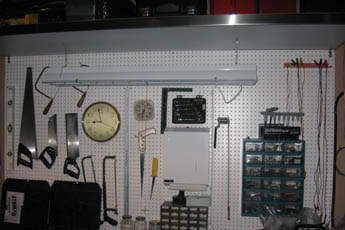
Once you have installed your workbench, consider running a metal power strip the full length of the bench on the wall just above it and install a pegboard on a 1” X 2” frame over that. With 9 foot ceilings there is room for a shelf above the pegboard. In the picture below, the top shelf rests on top of the pegboard frame. It is held in place with metal brackets. The front is suspended from the ceiling joists using large eye screws and chain. Be sure to mount a fluorescent light over the bench so you’ll be able to see what you are doing.
More Lighting
For a large double garage area, consider installing about 10 two-bulb fluorescent fixtures. Enclosed fixtures are available from Home Depot for about $18 each. The bulbs use 32 watts each so with all the lights on at once the draw is 640 watts.
|
|
|
Mark Scholz
Realtor, Portland Homes for Cars
(503)703-0618
PortlandHomesForCars.com
PR: Tell me about your business - how did you come to be interested in garages as a realtor?
MS: One of my niche areas in real estate is garages with attached homes. These are homes with large garages that of special interest to enthusiasts. It’s not always classic cars; sometimes it’s boats or quads or something else. They’re popular because people can always use inside space. I have yet to find someone who thinks their garage is too big. So I see a lot of homes with garages set up for working on cars -- everything from two-car garages to 20 car shops and everything in between.
PR: What kind of working space is best for a restoration project?
MS: I would ask the individual what kind of work they anticipate performing at their garage. For example, will they be painting, media blasting, or are they simply in need of a place to store parts while they send everything out to be prepared? Specifically, let’s talk about paint. If you’re going to deal with painting or anything to do with solvents, you can’t have an exposed flame heater. Flammability is a primary concern. You don’t want to burn down your house and your garage and your project.
PR: So climate control is always an issue.
MS: It’s more comfortable to work in a heated garage. Having warm air around you makes a big difference even if the concrete is cold. You want your shop to be as well-insulated as possible to keep the heat inside. Plus, waterproofing and insulation will help prevent condensation and surface rust on your parts and car. It also helps with noise emanations.
PR: After warm and dry, what else is important?
MS: You want good airflow and good access to the shop. If you’re dealing with old cars, you want a good flat driveway so that you won’t have a problem if your project isn’t running. You can’t push a classic car up some steep driveways. You also want a nice wide driveway to maneuver cars. Exposed aggregate or pebbled driveways are good for holding a car in place, but you can’t always use a floor jack and jack stands on that type of driveway.
PR: You mentioned airflow, what about compressed air for air tools?
MS: I keep my compressor outside my shop in a separate shed, and I’ve plumbed the air lines into my garage. I have a diagram for plumbing a garage with compressed air that I plan to post to my realty website. I like this diagram, because you can plumb any of its parts if you didn’t want to build the whole thing.
PR: Running water is nice in a shop, too.
MS: Yes, older homes often include a laundry basin or other access to hot water in the shop. Many enthusiasts have also installed old dishwashers in the garage for cleaning parts. Also, some might consider installing an indoor car washing station, if they have an appropriate floor drain. It’s much better if you need to wash your car in the winter.
PR: Where do you put all this stuff?
MS: Overhead - I like to use overhead spools for air, water, light, and electricity.
PR: What about floor coverings?
MS: Mainly, you’re talking about epoxy paints. You have two grades of paint available - the homeowner stuff and the commercial paint. You’re going to get what you pay for. The cheaper stuff will lift when you drive onto it with a hot tire. Also, here in the Northwest, our concrete retains water. It’s money well spent to have a contractor come in and apply the paint. You can also apply tiles or get some plastic interlocking floor materials.
PR: How about lighting?
MS: In a home garage, you can never have too much light. Light from above is great, but don’t forget about side lighting. Think about putting some fluorescent fixtures at about waist height on the walls. You’ll see that a lot in body shops to help them see imperfections in their work. But be sure to protect the bulbs from overspray and stray tools.
PR: What else should people be thinking about?
MS: Storage. You can never have too much storage. I like built-in cabinetry, and I put it up above car level. I recommend old kitchen cabinets salvaged from homes. You can buy these at building supply recycling places or at the Habitat for Humanity store. It all depends on what you can find. Old lockers or freezer boxes with locking doors are good for solvents. Old filing cabinets with roller bearings also work well and they’re very durable. Plus, they’re metal, so you can paint them. For small parts, see if you can find an old card catalog from a library.
|
| Click on any item below for more details at Amazon.com |
|

|
|
Jeffrey Zurschmeide
How to Design, Build & Equip Your Auto Workshop on a Budget
S-A Design, Paperback, 2011-09-15 |
|
This book is designed to help the practical hobbyist mechanic make the most of any available space, while staying within almost any budget. Illustrated with hundreds of color photographs, Zurschmeide shows you how to:
- Plan your workspace
- Choose your wall and floor coverings, windows, and skylights
- Design and install your electricity, lighting, plumbing, compressed air, a paint booth, and welding facilities
- Create and organize your storage space
- Select your tools, hoists, cranes and lifts
- And finally how to include the human amenities that make your workshop fun and livable
Hundreds of tips and examples show everything from ground-up construction, to rodent control, to finishing touches that will take your shop from good to great.
|
|
Lee Klancher
How To Build Your Dream Garage
Motorbooks, Paperback, 2008-07-15 |
|
Lee Klancher helps the reader understand the issues associated with building or upgrading a garage. He provides step-by-step instructions on how to deal with zoning, permits, and the entire design and finishing processes. Chapters include: The Structure, The Floor Plan, Power, Light, and Heat, Workspaces, Storage Options, Gearhead Tools, and Making the Most of Garage Space.
|
|
Richard Newton
Ultimate Garage Handbook
Motorbooks, Paperback, 2004-11-20 |
|
ASE Master Technician Richard Newton shows you how to set up a garage that is both fantastic-looking and practical. The book covers lighting and flooring upgrades, storage solutions, air compressors, heaters, blasting cabinets, work benches, toolboxes, and more.
|

|
Hot Rod Garages
Motorbooks, Hardcover, 2009-05-02 |
|
Hot rod photographer Peter Vincent’s Hot Rod Garages shows you the garages of more than 20 rod and custom builders. Featured are shops and garages of Pete Eastwood, Vern Tardel, Cole Foster, and Steve Moal; and top shops such as Brizio Street Rods and Rolling Bones.
|
|
Bayco
Bayco SL-800 30-Foot Cord Reel
|
This triple-tap extension cord is on a 30-foot retractable reel and is suitable for hanging from the wall or ceiling. It is very well reviewed by Amazon customers. The only drawbacks are that it does not come with the pictured mounting ring, so plan on purchasing a screw-in hook, and that it’s true length varies between 25 and 30 feet.
|
|
|
GogoCylcles.com has an interesting article warning against setting up your own paint booth.
|
|
|