|
Now that you’ve purchased your diamond in the rough, what are you going to do with it? Let’s ask some questions, lay out a strategy, or battle plan, and take care of the preliminaries.
What Can You Do And What Will You Outsource?
Your first order of business is to conduct an honest appraisal of your abilities. How much of this are you really able to do? You’ve probably got a pretty good idea of your mechanical abilities, but in actuality you’re probably capable of more than you give yourself credit for. You may not be fast at some things and some things may not be at all intuitive, but you can do more than you think.
The trap in assessing your abilities is not what you can do, but what you have time to do. It’s easy to think “I’ll do it all myself” and fool yourself that you can make the time to get it done. If you have talked to others and wondered why their simple-looking restoration took 10 years, wonder no more. It’s because devoting 10-20 hours a week is hard to do, especially if you’ve still got a job, a family, and a life.
If you’ve never turned a wrench in your life, are you willing to learn new skills? There are some great How-To books out there (many are listed in our Literature section), and most community colleges offer restoration, auto mechanic/body/paint or industrial classes in machining and welding. One of the lifetime benefits of restoration is that it can provide the push you need to learn new skills. And the satisfaction you’ll get when you say “Why yes, I did this all myself” is inestimable.
What do you know you’ll have to farm out? If you have the time, space, tools and confidence, then you can do it all. However, most of us mere mortals send out specialized jobs to those with the tools and experience to do the best job possible in a reasonable amount of time. These usually include engine machining, paint/bodywork, complex restoration such as generators and wiring harnesses, and upholstery. Some of the best restorations/street rods I’ve ever seen were done by “non-mechanically-inclined” people who used the experts when needed and educated themselves on everything else.
Before You Go Any Further
Right now, go out and purchase or make a large sign that says: “Keep It Simple Stupid!” Display this sign prominently in your shop and refer to it often.
 |
|
Hint... |
|
Before you touch the car again, go out and take quality pictures of everything on the car from every angle, near and far. Then take notes. As you disassemble things take more pictures and take more notes. Draw pictures and diagram things. These will prove invaluable as you go through things and start putting them back together. Shop manuals and parts books (available in our Literature section) are invaluable, but only go so far in showing how something is assembled or routed. Leaving them on the computer is fine, but it’s really nice if you have them printed out (they don’t even have to be color...b&w is fine) and in some kind of order in a binder or sleeves for quick and easy reference when you’re wrestling something under the dash.
|
Order of Disassembly and Sequence of Jobs
Luckily for all of us, others have restored cars before us and we have the benefit of their experience. The basic sequence of restoration is this:
- Disassembly. You can disassemble (and document!) the whole car all at once, or in functional areas. But be aware that by the time you get to body and paint work, you’ll need the car reduced to an empty shell, so full disassembly is likely to be completed early in any case.
- Cleaning. Working on a dirty car or dirty components is a drag. When you’re underneath the car, dust and yuck will be falling on your face, seeking out your eyes and your mouth with amazing accuracy. One of the first things you should do is clean the underside and engine compartment. This will make your life much easier later. Ideally, this should be done with steam cleaning, not cold-water pressure washing. Pressure washing just doesn’t have the oomph to remove old grease, tar-impregnated dirt balls or petrified roadkill. You need the heat of the steam to melt all that away. If pressure washing is all that’s available in your area then go with it, because availability of steam can be problematic due to ever-tightening EPA regulations.
- Mechanical. Are you going to go through the engine and transmission? They’re the first things to pull out and get going. On some cars it’s easier (and sometimes necessary) for you to pull the whole front clip assembly (front fenders, inner fender panels, radiator support, and grill). It’s not as tough to do as you might think. All the accessory items such as carb, fuel pump, water pump, generator/alternator, radiator, and so on, should be farmed out if others are going to restore them for you. Once the drivetrain is out, you can work on the suspension, brakes and differential in an uncluttered environment.
- Body/Paint. This is very dusty work. If necessary, pristine, freshly restored mechanical components can usually be adequately covered to avoid dust and overspray. If a car has two paint jobs on it (the original and one more) then it’s time to strip it to bare metal. Use all care with this procedure because older cars used a lot of lead as factory body filler, and you don’t want lead poisoning or lead dust hanging around your shop. Stripping the car will also reveal any rust, concealed or poorly repaired previous damage and the dreaded “pink surprise” (bondo).
This is also when you must decide if any of the interior parts (dashboard, window surrounds) are going to be painted. If so, they must be removed at this time. Any plating or stainless work should be started at this time as well. Don’t forget to include interior plated/stainless pieces now as you’ll want them ready to install when you’re ready to start on the upholstery.
- Reassembly. When you’ve got all the parts done, reassemble the basic car. Think the process through for your specific make and model. Some cars benefit from installing the engine and transmission first, while some others can leave that until later.
- Interior. We leave this to the last because it’s clean and you want it to stay that way. You don’t want grease or overspray on your new leather seats. Also included in interior work is glass, window regulators, window channels, insulation removal and installation.
You may need to alter these steps based on the specifics of your restoration. For example, if you’re not taking the car all the way to bare metal, you won’t have to completely disassemble it. You may choose to leave the suspension in place and restore it at a later date, or some other variation. The important thing is to have a plan and think through the whole process. Now go make it happen!
|
 |
DO |
- Make a detailed plan for your restoration
- Take responsibility for educating yourself in new skills
- Take lots of photos and notes when disassembling the car
- Take your time and get each step completed before moving on
|
 |
DON’T |
- Don’t be afraid to change your plan, if necessary
- Don’t be afraid to learn new skills
- Don’t decide “I’ll remember this” and fail to take photos and notes
- Don’t forget that restoration is supposed to be fun!
|
|
|
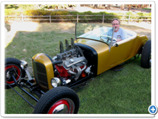
Shortly after I bought the Popular Restorations feature car, I called around to see who would be willing to rebuild the engine. Portland Engine Rebuilders (PER) was on a list of restoration shops that was posted on the internet. PER was happy to do the rebuild and suggested I contact Bob Earls, a restoration mechanic who works on classic cars. He is also the person who wrote our Restoration Strategy article.
Bob came out to see the Packard at a storage garage and gave me a few pointers that were invaluable in helping me decide upon a strategy. In Bob’s article he starts out considering “What You Can Do and What You Will Outsource.” Here’s what I planned and how it actually turned out.
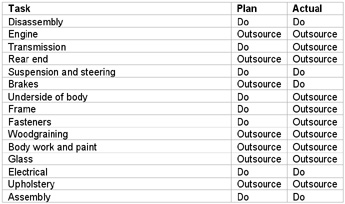
As you can see I ended up outsourcing the transmission, the underside of the body, the frame, and the fasteners. On the other hand, I ended up doing the brakes myself. The reasons for changing my mind on the outsourcing are covered in the Manual Transmission, Anti-rust Coatings and Sealants, Frames, and Plating - Zinc, Cadmium, etc. articles.
In general, my strategy worked out well. The only thing I would change would be to have had the undercarriage steam cleaned before I started. But otherwise I did the restoration more or less in the order Bob suggested--and was happy to have had good advice at the outset.
|
|
Ed Godshalk is an experienced restorer of rare Italian cars. His past experience includes the restoration and preservation of Alfa Romeo, Lancia, Amilcar and Bugatti automobiles that have been shown at Concours events such Forest Grove, Kirkland and Pebble Beach. His current project is a 1948 Cisitalia factory team race car that competed in the Mille Miglia, and was driven to second place in the Targa Florio by legendary piloto Piero Taruffi. We asked him to talk about his approach to restoration.
PR: How do you approach a restoration project in terms of a strategy?
EG: With my earlier restorations, if I had really sat down and done a budget I would have realized that I never should have bought the car in the first place. The cost of restoration, at the time, was more than the car was worth. Now I sit down and pencil it all out before I start. I guess this comes under the heading “Experience is lessons learned from past mistakes.”
PR: What steps do you go through?
EG: I start by photographing everything like crazy. I use those photos 24-7. I’ve made up books of photos for my restorations. Then I disassemble everything - engine, drivetrain, electricals, so it’s sitting on its axles when I take it to the body shop. At that point, you have to know how good you want the car to be when it’s done - tops would be concours, then there’s showable at local club events, then street, and I wouldn’t bother below that. From then on, I act as a general contractor. I sub out some things to myself and sub out some things to other people. I’m pretty good at figuring out what are long lead items, such as bodywork and engine machining. You can easily wait six months for a performance engine, and considerably longer if it’s a rare car. Another long lead item is the brightwork. I try to photograph all of the trim items and give a copy to the plating shop and keep one for myself. A good plating shop will appreciate having this, since they can simply check off each item when they are done with the job.
PR: Do you take every piece off of every car?
EG: You have to think before you pull stuff out. For example, if you simply want a street or local show-worthy car, I would do things like looking at the rubber trim around the windshield glass. If it’s in good condition, you may want to consider leaving it and painting under it, because the rubber kits don’t always fit well. That can be a cost-saver, because pulling the glass and replacing all the rubber can cost up to $1,000, depending on the car. Also, you need to know what you’re doing with trim that fits into the rubber around the window, because you can ruin it taking it off of the car incorrectly. I have a painful memory of holding the windshield from a 1958 Alfa Romeo Giulietta Spider by the two side pillars when unexpectedly the glass suddenly slipped out of the channels in the rubber trim dropping squarely onto the transmission tunnel and breaking it in half -oops!
PR: What do you send out and what do you keep?
EG: I can’t do good welding, so I subcontract out all the body and paint work. Unless you do that professionally, or almost professionally, you probably won’t be happy with your results. I do my own engine assembly, transmission assembly, suspension, and brakes. I schlep all the stuff all over town and I’ll track down parts. That way I can keep costs down.
PR: So you save money by doing a lot of work yourself?
EG: It’s nonsense to pay someone to do legwork for you when you can do it yourself. It doesn’t take any special skills to get on the phone. I did all the research on 1948 Cisitalia, including all the legwork gathering all the information and missing parts, which included three trips to Argentina to study the surviving sister car. That would have added substantially to the restoration cost if I had someone else do it, and I doubt anyone else would have been willing to sit in pigeon droppings on a dirt floor to make accurate drafting measurements of that car. An enthusiastic owner can put more time and devotion into gathering such information than is rational financially, since it is difficult to pay someone to be as passionate about your project as you are.
PR: Is there any special order to your work plan that’s not obvious or typical?
EG: If the painter will work with you, it can make sense to have the interior of the car painted first and then install all the wiring, engine, brake lines, and so on, and then bring it back and have them shoot the outside. With many very old cars, the whole car is shot inside and out with primer, and then the final coat only covers the outside body. If you can get the parts installed first then you can avoid messing up the nice exterior paint, since inevitably you will scratch up the car’s exterior surface repeatedly when installing these parts. This approach doesn’t generally lend itself to modern cars where the interior and exterior paint are best shot together, but for many Italian cars of the 1940’s to 1950s vintage it can work well.
PR: What do you do after the restoration is complete?
EG: Doing the show circuit first makes a lot of sense. Get it on tour for a couple of years. If you’re going to sell a car, the time to do it is when everything is still perfect. Sometimes I sell them because I’m broke or ready to move onto another project, but sometimes I drive them for years. I like to enjoy the car and let it get some patina. I try to take every car to 10s, mechanically, and then I do regular oil changes and I check the car over every year. I now check suspension and welds fanatically, since I had a car that I had maintained regularly and drove for over 30,000 miles; then one day while under braking the suspension failed due to a weld that was defective from new resulting in a bad crash. As an automotive chassis engineer friend said “When suspension fails everyone hits the wall.”
PR: What advice would you give to new restorers?
EG: I work very hard to keep my restorations in the black. That is, so the value of the car meets or exceeds the cost of restoration. Generally I’ve been successful at it. Step one is to pick the right car. It’s not enough for the car to be rare; people have to want it. I pick cars with historical merit and where there’s demand for it. It’s all a matter of supply and demand. There’s a lot of psychology to it.
And when I talk about keeping it in the black, I’m assuming that my own labor is free. I’m just talking about keeping out of pocket expenses in line with the value of the car.
For the majority of people, they should not do a concours restoration. It just doesn’t make financial sense to restore most cars to concours level. If you do a showable street job, you can be much happier in the end. You can easily bump your costs by at least double or triple to do a concours restoration, and you’ve correspondingly reduced the market for the car by the same amount, because fewer people can afford it. At that point it can be very difficult to justify the risk of driving such a car on any sort of regular basis, and it often becomes a static piece of art on display, which for many people defeats the whole purpose of owning the car in the first place. I do need to commend a friend who restored his 1927 3-liter Bentley to a level that allowed him to win his class at Pebble Beach, and then proceeded to use the car regularly; eventually running it in the Mille Miglia in 2007. I really admire that spirit.
|
| Click on any item below for more details at Amazon.com |
|

|
|
Tom Benford
The Complete Idiot's Guide to Restoring Collector Cars
Alpha, Paperback, 2004-08-03 |
|
The first 150 pages of this book are dedicated to the process of finding and deciding upon a restoration project and determining your restoration strategy. This part is covered in detail, and covered very well. The last 50 pages or so cover what to do with your car after the restoration is done, which leaves just over 100 pages to cover the actual work. For example, the chapter on engines assumes that the basic mill is in good shape, and simply covers tuning, carb adjustment, and freshening the engine bay. This is not a step by step mechanical manual - but it offers some of the best coverage on every other aspect of restoration.
|
|
|
|