|
For many restorers, the engine rebuild is the heart and soul of the project. The engine is the prime mover, and often the attribute that attracts the restorer to the project. Many enthusiasts will pass over cars with basic engine options and select only those with high performance options. This is especially true of “Muscle” cars from the 1960s.
So what happens when you’ve removed the engine? It’s probably gunky, and it may have serious problems lurking beneath the valve covers. When you install it in your project, you want it to look--and run--just as good as it did when your car was new.
The challenge is that few of us are qualified to restore an engine. The process requires considerable professional-level skills and a number of large precision tools that typically cost tens of thousands of dollars. Beyond that, we can’t afford to learn by trial and error on an engine that may be irreplaceable.
 |
|
Warning... |
|
Before you attempt any major service on your vehicle be sure you have a good repair manual. If you don’t have a manual check the Recommendations section on this page, search Amazon for your car’s make and year, or visit our Literature (Books, Manuals) page. You may also want to ask members of your local car club for recommendations.
|
Thus, there are two main strategies you can use when it comes to engine work on your restoration. The first is easiest, and only slightly more expensive. That’s to take your engine to a qualified, reputable engine rebuilder with experience working on your make and model. They will take your greasy hunk of cast iron and deliver you back a clean, painted, remanufactured engine complete with a warranty. You’ll still have plenty of work to do, rebuilding the carbs, starter, generator, distributor, and so on.
The advantages to this plan are obvious. You get back a reliable engine with a warranty. But for some, the journey is its own reward and they wish to fire up an engine they assembled personally. You can save about 10% of the cost of an assembled rebuild by doing the final assembly yourself.
For those hands-on restorers, you can ask the machine shop to disassemble, clean, crack-check, measure, machine, and test-fit every part, and then return your engine parts unassembled. Then you can get yourself a complete gasket kit and an instruction manual and assemble your own engine.
Engines are not magical devices; there are no real secrets to a good assembly. However, engines are precision machines, so you’ll want to be sure that you have assembled your engine correctly. That means an accurate torque wrench and a number of other specialty tools, such as a piston ring compressor, will be required. Many of these tools can be borrowed from friends or rented, if need be.
Be sure to assemble your engine with proper assembly lubricant, and remember to use sealant products where sealants are required, and resist the urge to use them when they are not required. More than one fresh rebuild has been murdered by a glob of loose RTV goop getting into an oil passage!
And if you’ve got parts left over when you’re done assembling, that’s a good sign that you missed something important. Go back and get it done right before you try to fire up the engine!
When you’re ready to test your work, you should follow the startup instructions from your rebuilder.
 |
|
Hint... |
|
If you assembled the engine yourself, here are some good pointers:
· Fill your sump with natural motor oil for the first startup. This helps the engine seat its rings and helps all parts wear in together for a good fit. Once break-in is complete, change to synthetic oil for maximum protection.
· Leave the spark plugs out of the engine and lubricate the cylinders with oil, then use the starter to spin the engine until oil pressure comes up. This primes the oil passages and prevents a dry start. The assembly lubricant you used will keep things moving until oil arrives.
· When you’re confident that everything is ready, go ahead and put the plugs in and fire up the engine. Don’t expect it to run well or idle right away. You’ll still have some adjustments to make.
· Follow a conservative break-in procedure for your particular engine make and model. Consult your books for oil change frequency and engine speed/load recommendations during break-in.
|
The bottom line on engine rebuilds is this-- you get what you pay for. If you enjoy the satisfaction of listening to the rumble of an engine you assembled yourself, then by all means do that, but you’re unlikely to save much money, you won’t have a warranty, and statistically you’re likely to introduce more problems than you fix.
It gets back to your goals for the project. If your goal is to learn and put as much of your self into the project as possible, then do your own engine assembly. If your goal is to drive or show the car, then have your engine built by the pros.
|
 |
DO |
- Remove your engine and strip all ancillary components before a rebuild
- Use all new bearings, seals, valves, valve springs and piston rings
- Take your engine to an expert rebuilder
- Upgrade older engines to accept unleaded fuel
- Always keep your engine work area scrupulously clean
|
 |
DON’T |
- Don’t neglect stripped or damaged threads
- Don’t assume that internal parts are structurally sound
- Don’t try to save money by shortcutting engine rebuild procedures
|
|
|
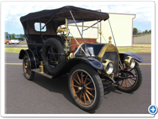
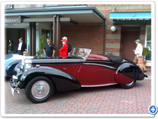
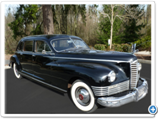
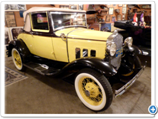
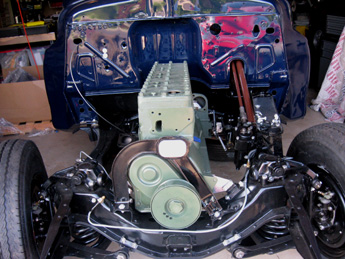
The Popular Restorations feature car engine is a 356-cubic-inch, flat-head straight eight. The 356 replaced the Packard V12 in 1940 and in its day was thought to be very powerful and reliable. As a matter of fact, it was the most powerful production engine from 1941 until 1947, rated at 160 horsepower before the war and 165 after. With nine main bearings it was so smooth you could balance a nickel on its head while it was idling. And it had so much low-end torque you could easily drive away from a stop in third gear--although this wasn’t particularly good for the clutch.
Before removing the engine from the car I checked around for a rebuild service that would rebuild classic car engines and found one right off the bat. Portland Engine Rebuilders gave me an estimate of about $3300 and that included balancing. Parts alone would have cost over $1000 so the estimate seemed fair.
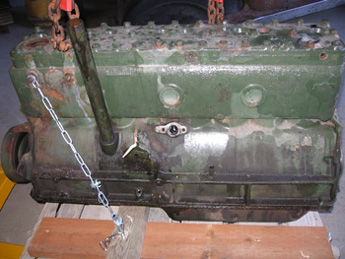
Portland Engine Rebuilders (PER) offered to pick the engine up but wanted it out of the car and stripped down to a long block. And they wanted it on a pallet. So, after taking some photos, I tore it down, set it on a pallet, and secured it with some chain for the ride to the shop.
The engine was done long before the chassis was ready to receive it, so I just installed the pan, the valve covers, and the timing cover.
Later on, when it was time to install the engine, I used naval jelly rust remover followed by brake cleaner to remove the rust and oils from the block and engine sheet metal. Before painting the engine with Packard Engine Green spray paint (from Bill Hirsch Auto) I sprayed on a coat of self-etching primer (from NAPA) which comes in a color remarkably close to the Packard Green.
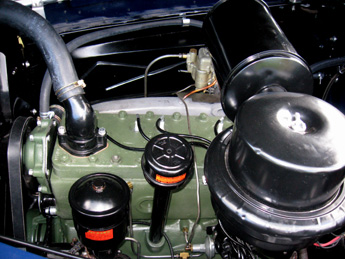
Once started, the engine had a few minor leaks, but tightening up fittings and bolts eliminated them.
Overall the engine runs very. It is quiet and powerful with an enormous amount of torque. It start’s easily and does not overheat, even when idling for long periods in a parade.
|
|
Ted King - Owner
1001 SE Hawthorne Blvd.
Portland, OR 97214
503-230-1276
www.portlandenginerebuilders.com/
PR: How does engine restoration fit into a restoration project?
TK: We see a lot of restoration work. The procedure is real simple. The customers make contact on the phone, searching for someone who knows something about their particular project. At our company, we keep detailed records of every engine we’ve done, and we’ve done 26,000 or 28,000 complete engines. We keep a record of every Packard we’ve ever done, for instance. With a few keystrokes on the computer I can come up with a detailed list of exactly what was done to each engine and what it cost.
PR: How do you price out your engine work?
TK: One of the first things people want to know is about what they’re facing in terms of budget. If you’re restoring a 75 year old car, there’s interior, exterior, and paint as well as the engine, clutch, transmission and so on. We define each engine by a part number, so we know what years and models a particular engine will fit, and when a change happened, we assign a new part number. Over the years, there are about 2,500 to 3,000 part numbers for engines. With our system, we’re able to have instant recall and quote out a job over the phone. We don’t give approximate estimates, we can say it costs exactly this much. I can price a job within ½ a percent, assuming the customer’s engine core is in satisfactory rebuildable condition.
PR: What’s the process to remanufacture an engine?
TK: The first thing I do is write up a work order and assign the project a bin, to receive all the parts. Then I make a detailed registry of what all came in with the engine - down to every nut, bolt, and screw that’s affixed to the engine. That’s so when the engine is done, we can be sure the customer gets everything back. Next, the men in the back room dismantle and clean the engine. That’s half the process, usually, because they come in so doggone dirty! We use an oven-bake and shot-peening process that removes every bit of dirt and rust. The other process we can use is a hot-tank process, which is a degreaser, but doesn’t remove rust or scale. After that, we go through a magnafluxing process for crack detection, and we fix any minor defects we see, such as bolt hole thread repair.
Then we go through the standard machine shop work. We align-bore to check the crankshaft tunnel. We bore the cylinder walls and order pistons after the bore job is done. Once the pistons come in we measure each one and then hone the block to fit the pistons for the final fitment. Everything is hand-fitted once we’re finished, to get a perfect fit every time. The crankshaft goes over to the crankshaft department to be checked for straightness, then it gets magnafluxed. Then the crank is reground and bearings are ordered after we know what size the crank was ground to. The connecting rods are reconditioned and resized. We swage in new wrist pin bushings and hone those to size.
In the head department, we put in new valve seats and new bronze valve guides. We use new springs and shim them for proper spring pressure. Then we reassemble the engine in long block form and spin-test it in our quality control machine. We hook a coupler up to the flywheel flange on the crankshaft, and we put it through a rotational spin test. Bob Fairchild will adjust every valve, retorque every bolt, verify that the camshaft timing is correct, and he’ll inspect every bolt hole. You’ll never get an engine with a stripped bolt hole out of my shop.
When we’re done with an engine, we represent it as a zero-mile engine. It isn’t just a rebuild, it’s a remanufactured product - like new.
PR: Do you grind your own cams?
TK: We do not. We buy our cams new or we can have Oregon Cam Grinding regrind those. They have an excellent record. That’s the only thing we sublet.
PR: Do you update older engines at all?
TK: One thing we do is on engines made before 1974, they are not compatible with unleaded fuel. So we commonly put in hard valve seat inserts for unleaded fuel.
PR: Do you have a preferred gasket maker?
TK: It used to be that FelPro was the big name gasket maker, but since Federal Mogul bought them out, the quality has gone way way down. Many customers request Engine Tech gaskets. They’re a company that makes the most common engine gasket sets. It depends on how rare the engine is. If it was a Packard or something like that, we’d get that through Best Gaskets, which is a company in California that is making antique gasket sets. That’s another strength of our computer system. With our inventory control and purchasing records, we can tell you what we used in every engine and we can look at the last couple of engines in our history and know where we got the parts last time. If there’s ever a problem, we can flag that as a “do not put it on” or “do not buy” product.
PR: People use the term “balanced and blueprinted” about their engines. What does it really mean?
TK: Blueprinting is a slang term used in the industry. In 30 years of working on engines, I’ve never seen an exact definition. To me, blueprinting is when an engine is designed, the engineers create a blueprint with precise coordinates as a specification. We have a blueprinting center with a Rottler CNC engine machining center that works based on coordinates, and by that definition, we can reproduce those specifications in our shop. But “blueprinting” by itself is a slang term.
Balancing, however, is a term that a lot of people use in the same sentence. About 50% of the engines we do get a balance job. We do static balancing and dynamic balancing. Pistons are brought to identical weight to plus-or-minus ½ a gram. That’s our shop specification for “in balance.” Connecting rods are hung horizontally and the big ends are weighed separately from the little ends. Those are match-balanced to within a ½ gram tolerance. Then the crankshaft, flywheel, harmonic balancers and clutches get a rotational dynamic balance job done on our Balance Technology balancer.
PR: What is an ”internally balanced” engine?
TK: There are two different styles of balance jobs - and it depends on the engine manufacturer. Most Chevy small blocks, for example, are “internally balanced” or “neutral balanced” - those are the same thing. They have no counterweights on the harmonic balancer or the flywheel. So we balance the crankshaft, then add harmonic balancer, the flywheel and pressure plate and balance those. So at the end of the process, it’s an assembly.
But once the small block achieved 400 cubic inches, they became externally balanced with counterweights on the harmonic balancer and the flywheel. On other engines, such as Fords, Chryslers, and all big blocks, they all have to be counterweighted. They’re all balanced as an assembly.”
PR: Assuming all the basic parts are good, what should someone expect to spend for a V-8 engine remanufacturing process?
TK: A typical engine is under $2,000. Our stock 350 Chevy is $1,185. That’s our standard replacement engine. We offer a 290 horsepower engine with a torque plate hone, balanced statically and dynamically, performance cam, the compression ratio is elevated, two-roller timing chain, and some other nice features. Those run $1,750 to $1,850 range. That’s the most popular small block Chevy we offer.
PR: Do you handle imported makes as well?
TK: We’ve done quite a few Austin-Healeys and MGBs. We’ve done a few Triumphs as well. We’re doing a Triumph Stag right now.
PR: Do you offer dynamometer tuning?
TK: We do have an engine dyno. We supply the customer the long block and we ask them to dress it up to their satisfaction and bring it back for dyno tuning.
PR: What’s the most important thing in your business?
TK: I make sure people get treated fairly here. You have to be fair, because the minute you’re not, that information will travel like wildfire.
|
| Click on any item below for more details at Amazon.com |
|

|
|
David Vizard
How to Rebuild Your Small-Block Chevy
HP Trade, Paperback, 1991-06-18 |
|
Hundreds of photos, charts, and diagrams guide readers through the rebuilding process of their small-block Chevy engine. Each step, from disassembly and inspection through final assembly and tuning, is presented in an easy-to-read, user-friendly format.
|
|
Tom Monroe
How to Rebuild Small-Block Ford Engines
HP Trade, Paperback, 1987-01-01 |
|
This book covers all years and models including 221, 255, 260, 289, HP289, 302, and 351 cid engines. It covers the step-by-step rebuilding process of the popular small-block Ford engine. Parts inspection, diagnosis, reconditioning and reassembly are outlined in simple text. Hundreds of photos, charts, and diagrams visually walk you through the rebuild process.
|
|
Ron Bishop
Rebuilding the Famous Ford Flathead
McGraw-Hill Professional, Paperback, 1981-05-01 |
|
A complete, step-by-step, easy-reading guide to restoring the famous Ford V8 Flathead engine...covering all models from 1932 through 1953.
|
|
Tom Monroe
Engine Builder's Handbook
HP Trade, Paperback, 1996-08-01 |
|
All of the information in this valuable companion guide is presented in easy to understand terms . It is packed with general tips, techniques, and procedures that can be applied to all types of engine building, whether for muscle cars, classics, hot rods, powerboats or all-out race cars.
|
|
Ben Watson
Pro Engine Blueprinting
Motorbooks, Paperback, 1997-12-13 |
|
This do-it-yourself guide is applicable to all engines and manufacturers. It defines blueprinting, what it does, and why it’s important to you.
|
|
Ben Watson
How to Rebuild Your Engine
Motorbooks Intl, Paperback, 1993-09 |
|
Watson provides all the information, lists of tools and parts, and clear instructions to get the job done. Every step of the rebuild process is covered including engine disassembly, measuring of components and clearances, machining, selecting new parts, reassembly, start-up, and troubleshooting.
|
|
|
For classic car engine rebuilding and parts go to Hemmings and search their Services or Parts categories.
For engine rebuild kits try RPM Machine.
For performance parts try the following:
Summit Racing Equipment is the largest Internet supplier of high performance automotive parts and accessories.
JEGS Performance Auto Parts has the largest selection of quality performance parts.
|
|
|