|
You can spend all the money in the world on the best engine rebuild, and it won’t mean anything if you don’t get the carburetor rebuilt correctly. In fact, if your carburetor is faulty, it can leak extra air into your intake stream and blow up your expensive engine! It pays to have your carburetor and the rest of your fuel system restored as carefully as any other system in your car.
 |
|
Warning... |
|
Gasoline is extremely flammable, and gasoline fumes are explosive. Always use common sense, caution, and fire protection when working with parts that are exposed to gasoline. If your fuel tank or other components require welding, take them to a professional who works with fuel tanks.
|
When you go to restore a fuel system, your main enemies are water and time. Water gets into every fuel system - most often when you add gasoline, but water also condenses in your fuel tank from the air. Because most fuel tanks are made of steel, that makes a perfect environment for rust. In addition to wearing away the walls of your fuel tanks, rust clogs filters, fuel pumps, fuel lines, and carburetors.
The second enemy is time, and specifically what happens to old fuel over time. Gasoline is made from volatile compounds, and these constantly evaporate in your fuel system. Usually this isn’t a problem, because you’re using the fuel before any large amount of evaporation takes place. But when you buy a car that has been sitting for a decade or more, the stuff in the fuel tank has substantially changed from gasoline to a kind of nasty varnish with a gummy lower sedimentation layer. Sometimes the gasoline has evaporated completely, leaving its other ingredients behind as a crust.
You can bring back your fuel tank and the rest of your system, but you have to do it carefully to get the best results. A steel fuel tank may be “boiled out” or “Hot tanked” to remove rust, varnish and gunk. Make sure that the cleaning process did not reveal any pinholes, leaky seams, or other dangerous flaws before you reinstall that tank in your car. Steel fuel lines can be purged with fresh gasoline and then blown dry with an air compressor. If they have rust or cracks, you may need to replace them.
All flexible fuel line should be replaced with new modern fuel line rated for modern fuels. This is a challenge for restorers because many vintage cars used natural rubber lines. Modern gasoline is almost always mixed with ethanol, and the concentration of ethanol in gasoline is on the rise. Ethanol will melt rubber fuel lines into a gummy mess and will also melt the varnish and crud buildup in your fuel tank and lines if you haven’t already cleaned them. Ethanol may also attack rubber seals and diaphragms in your fuel pump, carburetor, and anywhere in your fuel system.
Both electric and mechanical fuel pumps can generally be rebuilt, but even if yours is working well, take a moment to make sure that any internal screens or filters in the pump are cleaned or replaced. Some cars have filters in the tank, in the lines, at the pump, and again at the carburetor inlet. Find and clean all of your filters to ensure a good flow of fuel. Clean fuel pumps in fresh gasoline only - acetone and other products may dissolve the pump diaphragms.
If you have a vintage electric fuel pump, it probably uses contact points or other vintage electronics inside. This is a frequent source of failure. You can now buy fuel pumps that look perfectly vintage on the outside, but use modern solid-state electronics on the inside for reliable operation.
If you are considering adding an electric fuel pump in place of or in addition to your original mechanical pump, you should check judging rules before you take your car to a show. According to the Classic Car Club of America Judging Guidelines, aftermarket fuel pumps (whether electrical or mechanical) are considered inauthentic on 1946 and later vehicles, which means you’ll get points taken off if it is found. But they do not deduct for an electric pump placed on a 1942 or older vehicle, “provided that the installation has been done in a workmanlike manner and the pump is not in plain view.” If you’re not sure, follow the basic rule -Don’t do it!
Many vintage cars use fuel filters made of a glass bowl and some kind of screen. The glass bowl is nice because you can see accumulations of sediment, rust, and water. Plus you can take a quick look at the color and consistency of your fuel. But these can tend to leak and don’t work under pressure. Consider placing a modern fuel filter in line in some invisible location to give this filter a light load.
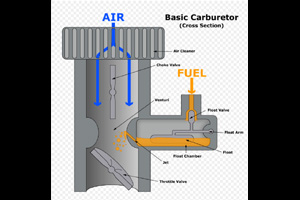
All of the problems associated with bad old gas are worse inside your carburetor. Your carb has many moving parts that need to be working smoothly and many tiny holes through which air and fuel must pass freely. The same gum and crust that accumulates in your fuel tank, lines, and filters ends up in the carburetor and can cause the internal workings to stick. More than one carb fire has happened when someone tried to fire up a car with a stuck carb float!
Carburetor bodies are most often made of pot metal - a cheap aluminum alloy. If yours is made of brass or cast iron, use approved methods to clean that material. But if you have any doubts, never put your carburetor body into the kind of hot tank that is used to clean steel - the aluminum will melt and you’ll get nothing back. Use a “cold tank” with a light acid solution, or just clean the body carefully with fresh gasoline.
Send your carburetor to a professional to have the throttle shaft bushings replaced and the “butterfly” valve inspected and replaced, if necessary. These parts wear over time, and if they’re loose, they allow extra air to get into your intake mixture. This causes your engine to run leaner than you think and can lead to detonation, which can blow a hole right through a piston.
 |
|
Hint... |
|
Use fresh air to blow out carburetor passages and jets. Never ever use a wire or a drill bit to clean out a carburetor jet! It can scratch or widen the passage and throw off your mixture. The holes in jets and valves are made to flow precisely the right amount of fuel, so you have to be extra careful to make sure these are clean and not changed in any way.
|
You should test your floats to make sure they don’t leak. Submerge them in gasoline overnight and see if any gas leaks in. Just take them out of the fuel bath and shake them - if there’s fluid inside, they leak and will eventually sink in the float bowls, starving your engine of fuel. Sometimes you can repair a brass float with solder, but most often it’s cheaper and easier to simply buy a new float.
Finally, buy yourself a proper rebuild kit for your carburetor. This will include all the gaskets you need to seal up the carb and its mating surface on the intake manifold. This is critical for your mixture, because the most common place a carburetor leaks air is at the intake manifold mating surface. Your rebuild kit will also include new metering needles if your carb uses needles instead of jets. Old needles get worn where the needle meets the jet, so be sure to use those replacements!
Restoring your fuel system is a complex and precise job. You can outsource all of this work if you don’t feel confident in your own abilities, but aside from rebushing and working with the butterfly, this is a good area to practice and improve your own restoration skills. Getting the fuel system right is key to making sure your car runs like new when you’re finished.
|
 |
DO |
- Purchase a quality rebuild kit for your carburetor with all necessary gaskets and needles
- Clean your carburetor carefully, without removing any metal
- Use a fresh fuel filter
- Have your carburetor’s throttle shafts professionally re-bushed
- Clean your fuel tank and fuel lines during restoration.
|
 |
DON’T |
- Don’t hot tank a carburetor. It will probably dissolve in the caustic solvent
- Don’t try to fire up a car that’s been sitting a long time - you could have an engine fire due to a stuck float
- Don’t ream out carburetor passages (especially jets) with welding rods or drill bits or anything that might scratch or expand the passages
|
|
|
Restoring the Popular Restorations feature car fuel system was a fairly straightforward task--mainly because there were few unexpected side-trips and, in the end, everything worked well.
I had the fuel tank cleaned and inspected and it had no rust to speak of, so the shop recommended that I not boil it out. That was the good news. I asked what I should use to paint the tank and the mechanic said he could paint it for me, something that they often do. I said to go ahead, thinking it would save me some time. When I went to pick up the tank, I was quite disappointed as he had brushed a tarry substance all over it, which I suppose would preserve it, but it looked bad. In my effort to save some time I had created extra work. Now I had to strip the tank back to bare metal.
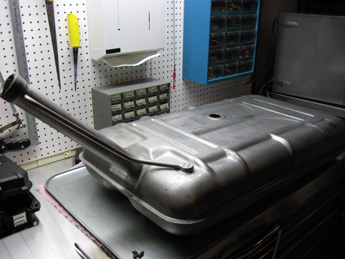
At that time I happened to be having the underside of the car body coated with truck bed liner. I asked if they could coat a gas tank and they said yes, but that I would need to prime it, which I did with self-etching primer.
Abbott Instrument Restoration in Portland, Oregon restored the gas sending unit. Before they fixed it, the gauge would drop to empty when it got down to about three-quarters full. I installed the restored unit on the tank and installed the tank onto the chassis, with freshly powder-coated straps and anti-squeak rubber (that goes between the straps and the tank.) I was happy with the appearance when it was all said and done.
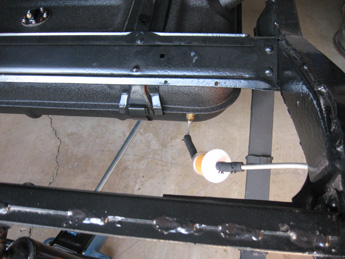
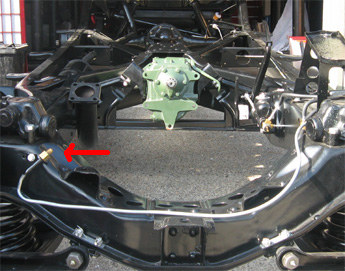
The gas tank line wasn’t too difficult to install. I used a tubing bender and some bulk tubing. Neither end needed flaring; the rear end goes into a hose for the fuel filter and the front end goes into a brass fitting attached to a steel plate, which bolts to the frame. The old gas line was silver soldered to the brass fitting so I got to try out silver soldering for my first time. I painted the steel plate with POR-15 along with a few inches of the tubing where its protective coating may have gotten hot enough to burn off.
The fuel pump was rebuilt (from Max Merritt Auto) and I had the carburetor rebuilt locally. The only incident with the carburetor was that it sat after it was rebuilt for nearly a year. When I installed it, the accelerator pump would not squirt gas as it should. I made a call to the carburetor shop and the owner walked me through removing a brass screw cap and freeing up a ball bearing that was stuck.
Other than that the fuel system restoration was unremarkable.
|
|
Tony Price, Owner
19730 SW Cipole Road
Tualatin, OR 97062
503-625-6900
The Tune-Up & Carburetor Shop near Tualatin, has shelves holding hundreds of carburetors of all brands and vintages. The owner, Tony Price, has decades of experience rebuilding classic carburetors.
PR: When someone begins a car restoration, what should happen to the carb?
TUCS: They should go through the carb, the fuel lines, and the fuel tank. A lot depends on the carburetor and how old it is. I know a place that sells rebuild kits for older carbs, but for the muscle cars, they’re readily available. For a really old car, the kits can be quite expensive.
PR: What are the carb failures you see most often?
TUCS: A carburetor is like a small toilet. There’s a reservoir, and the float and valve assembly keeps the correct level of fuel in the bowl. What happens is that when a car sits, the fuel turns to varnish and the float sticks in the bottom of the bowl. Then the carburetor floods if you try to use it. So you have to cold-tank the carburetor in a mild acid solution. You can’t use a hot tank because the aluminum in the carburetor will dissolve. Most of the problems are dirt, bad fuel, varnish, and throttle shaft wear.
PR: What happens with throttle shaft wear?
TUCS: The throttle shaft bushings become egg-shaped over time, and the throttle doesn’t come back to idle correctly. It will also leak air in the idle circuit. There’s a certain amount of air leaking by normally, but when you get too much, then your idle circuit can’t correct for it. It can affect the idle from 500 to 1,000 rpm. So you have to send the carb out to a machine shop and have it re-bushed.
PR: Can an amateur rebush a carburetor?
TUCS: No, if you’re off by even a few thousandths, you’ll have problems like high idle, or the throttle could stick open.
PR: How about base gaskets and intake manifolds?
TUCS: Base gaskets generally come with the rebuild kit. Problems with the intake manifold are generally cracks, which you fix at the machine shop - they have to be welded up.
PR: What should be done about fuel filters? Do you have specific recommendations for older cars?
TUCS: Many older cars came with a glass bowl filter in the fuel line. You can still get them. Usually I use a metal filter with a paper element inside. They work great.
PR: What about foreign carburetors like SUs and Webers?
TUCS: They’re basically the same. We don’t work on SU carburetors here, but we do restore Webers, Mikunis, Dellortos, and other brands.
PR: How much should someone expect to pay for a rebuild on a basically sound carburetor?
TUCS: It can range from a couple of hundred bucks to whatever it takes. If you have to buy a new carb and you need correct numbers on a rare care, the sky’s the limit. I talked to someone who was restoring a rare Packard. They found the carburetor in England and it was $3400, and that was as a core.
|
| Click on any item below for more details at Amazon.com |
|

|
|
Doug Roe
Rochester Carburetors
HP Trade, Paperback, 1987-01-01 |
|
How to select, install, and tune for the street or strip. Basic principles of operation, air and fuel requirements, repairs and adjustments, plus tips on choosing manifords and fuel-supply systems.
|
|
John Passini
Weber Carburetors Tuning Tips and Techniques
Brooklands Books Ltd, Paperback, 2008-03-15 |
|
This book shows you how to set your carburetor to suit a particular engine, troubleshoot an existing installation, and maintain and repair older carburetors. Anyone maintaining or restoring a classic Weber-equipped car will learn something from these pages.
|
|
Chilton
Weber, Zenith Stromberg, SU Carbs
Thomson Delmar Learning, Paperback, 1999-01-15 |
|
This book covers Weber, Zenith Stromberg, and SU carburetors. Many models are covered with several pages devoted to each. All repair procedures are supported by detailed specifications, exploded views, and photographs.
|
|
J Williams
Holley Rebuilding and Modifying
S-A Design, Paperback, 2005-04-01 |
|
This book takes you step-by step through disassembly, parts inspection, modification, reassembly, installation, and on-car tuning of all popular Holley modular carburetors. This hands-on guide includes clearly labeled steps and hundreds of detailed photos.
|
|
|
There is an excellent article on old fuel systems and how ethanol can effect them at the Oregon Chapter of the Classic Car Club of America website. Open this PDF file and scroll to the article It’s a Gas by Bob Earls.
CarBibles.com has good article called The Fuel and Engine Bible.
|
|
|