|
Reading through the articles on this site, a beginner might feel intimidated--so many things are labeled “tricky,” “challenging,” or “difficult” and almost everything is “important.”
Well, here’s your vacation, because auto glass is still important, but also generally easy. At least, it’s easy once you have the glass in hand! But even if your pride and joy arrived at your door without any glass, most cars that are old enough not to have available glass will tend to have flat glass, and that can always be cut to size and shape.
A quick search on Google for “Classic Auto Glass” turns up dozens of online businesses selling curved glass that would have been difficult or challenging to find just a few years ago. Most of these businesses stock flat glass templates for early cars as well. Most of these businesses are limited to domestic cars, but enough serve foreign brands to cover classic imports.
But when you’ve got your glass in hand, what then? Installation can still be tricky, but there are some tricks that help you with this part as well.
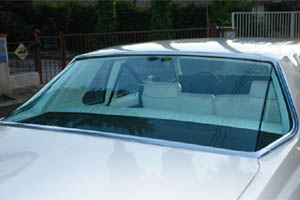
The most common situation for older cars is to have a rubber gasket around the edge of the glass. There’s a channel for the glass on one side of the rubber, and a channel for the window frame on the other side of the gasket. To install a window like this, you’ll use some heavy string like clothesline and some detergent-based lubricant like Simple Green in a spray bottle.
First, get the rubber gasket oriented correctly around your window glass -this is often trickier than it sounds. But make sure it’s right or at a minimum, your window will leak. Once the glass is well-fitted into the rubber, take the assembly and put it in place on the outside of the window hole. Spray the gasket liberally with your lubricant and put the string all the way around the gasket channel with several inches of string dangling out at both ends, which should be together.
Now you need a friend to help by gently--and we do mean gently--pressing in on the glass. Get inside and pull one end of the string out to pull the lip of the gasket over the ridge of the window frame. The lubricant will help the rubber squeeze through the gap. Continue carefully pulling the string until the lip is pulled in all the way around the window frame. If you crossed the two ends of the string, you should get the whole lip in without difficulty.
Note that this technique takes a little bit of practice! Don’t hurry and don’t work when you’re frustrated. It’s easy to do this, but also easy to break or crack your new glass.
The other options for mounting glass are removable frames with clips, gaskets, or glue, or simply gluing the glass into the window frame. With removable frames, you can usually disassemble the frame and get the glass out. Replacement rubber is easy to find because it’s not a single piece around the whole window, but rather just a piece of gasket that can be cut to the correct length.
Gluing the glass into the frame came into vogue in the 1960s because it was cheap for automakers to build cars this way. Of course, all that glue has long-since fossilized, leading to millions of cracked windshields over the years. It also means that it’s next to impossible to remove a glued-in windshield without breaking the glass. Special “hot wire” cutters are used that burn/melt the glue away. Then you get to chisel or cut out the remaining glue! It’s best to take care of that when you disassemble your restoration and really clean it.
If your glue-in windshield has clips or some other firm fastener holding it in place, consider replacing your windshield with black silicone RTV instead of the black hardening glue that is made for windshields. The RTV will hold the windshield in nicely and it’s 100% easier to remove if you ever need to take the window out again. But it’s not as strong as the glue, and your windshield could potentially pop out in a panic stop or if someone pushes against it from the inside. So some additional fastening is generally required.
Roll-up window glass poses a special challenge - you need to take apart the door to get this in place, and make sure that you restore all the channel felt at the same time, and that you get the winding mechanism working well. It’s annoying when your windows don’t roll up and down the way they should.
Whatever style of attachment your glass needs, you can call a professional automotive window glass installer if you want someone who has done the job a few times. They’ll generally do the job with your provided glass for a small fee, and they’ll come to your house or shop to do it.
 |
|
Warning... |
|
A word about metal trim: The metal trim (aluminum, stainless, or chrome) that may surround your windshield is both delicate and functional. In many cases, this trim “locks” the windshield in place. If you do not replace it, your windshield may pop out!
|
|
 |
DO |
- Completely clean and paint the window frame before installing new glass.
- Use lubricant and string to get a rubber-gasket window installed
- Consider using black RTV instead of windshield glue, if it is safe to do so
- Restore all gaskets, seals, and channels when replacing window glass
|
 |
DON’T |
- Don’t use excessive force to try to press a window into place
- Don’t work with glass when you’re tired or frustrated
- Don’t try to use RTV or other fillers if your glass doesn’t fit
|
|
|
Taking care of the glass for the Popular Restorations feature car was relatively easy. I didn’t really worry too much about removing the windshield because it was flat glass. I cut the rubber off on the outside and then pushed from the inside while a helper stood on the outside pressing gently back so the windows wouldn’t go flying if they broke loose all of a sudden.
The rear window required more care as it is curved and, while they may be replaceable, I didn’t want to go to the time or expense of obtaining another one.
When I rebuilt the doors I had the lower channels and the regulators powder coated.
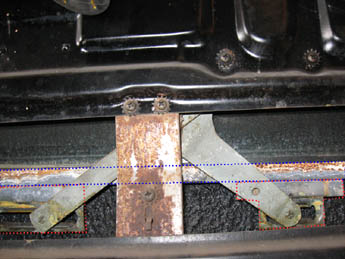
Before restoring. The lower window channel is indicated by blue lines. The brackets are indicated by red lines
The shop that cut the glass for me advised me to put a few marble sized blobs of urethane in the channels and set the glass directly into them instead of pounding the channels onto the glass with glass setting tape.
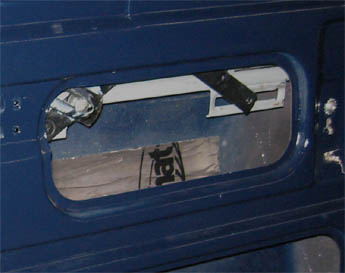
The window channel after powder coating and installation
The upper window channel was easy to install--I just put it over the new glass and formed it to the glass by hand before installing it in the door. A glass installer advised me to put a few drops of urethane on the top of the upper channel and then to hold it in place overnight by rolling the window up. Then to put a few more drops on the parts of the channel that goes down into the door and to hold it in place overnight by rolling the window down. He said not to cement the entire channel to the door as it would make it difficult to remove and repair later. The beltline weatherstipping (weatherstripping that runs horizontally on the inside and outside where the glass comes out of the door) seemed to be more difficult to install. For the Packard the weatherstrips do not come pre-curved at the ends and it didn’t seem that flexible to me. I didn’t want it to look like someone’s first try so contracted the installation out to a local restoration shop.
The 1946 Packard had front and rear vent windows and both have chrome frames. I re-chromed the front frames and polished the rear; the glass installer then fitted them with new glass. The installer also installed the front and rear windows using the method outlined in our Glass article. After the installation he injected urethane into the crack between the glass and the seal on the outside of the car and applied butyl between the rubber and the metal on the inside of the car. He says that he only has customers report leaks about once every three years.
The cost for the glass was about $700 for the materials and installation. I chose glass without tinting as that is what was installed originally.
|
|
Jim Arnold
www.oldcarglassguy.com
Oregon City, OR
503-519-3443
PR: What are the important issues to consider when it comes to restoring classic glass?
JA: The problem most people have is finding someone able to do it. Most mainstream auto glass companies don’t do old cars any more because there’s no money in it. I’m just an old guy who’s been doing this since 1965.
PR: What range of window glass do you carry?
JA: I’ve got original patterns for every American car made with flat glass back to 1918. They didn’t start curving back glass until the late 30s, and they didn’t start curving windshields until the late 40s. I have access to most of that glass, too.
PR: What do you do to restore glass on an old car?
JA: The main thing is that I do everything that nobody else wants to do. I do full glass restorations. I take a car that has absolutely nothing in there and I rebuild the doors, replace all the glass, go through the regulators and make sure everything’s proper, even weld teeth onto the regulator if I need to. Then I align and lube everything and just make it all work as best I can with 50-75 year old materials.
PR: Do you work on new cars?
JA: I don’t work on anything newer than 1970, except for a few exotics like Rolls-Royce, Ferrari, and stuff like that.
PR: What does it cost to get this done?
JA: It’s pretty loose. A pickup truck might be $250 and a big four-door sedan could be $600. I do a lot of custom work for street rods with power windows, and I cut down windshields for chopped tops.
PR: Can you work with rubber gaskets as well as glue-in windshields?
JA: All the old cars used rubber gaskets. The first glue-in windshield was on a 1963 Buick Special. I stock a lot of rubber gaskets, but the only time I send a customer out to buy a gasket is if I can’t offer a better price than he can get. Mostly, I come up with all the materials - all the channels, felt, rubber for the vent windows, and so on.
PR: Do you have any special tricks for installing windshields?
JA: Using rope is the best way to do those. I don’t use lube to install a windshield, though. I make sure that I always pull the rope straight towards the center of the glass. I keep that angle at 90 degrees to keep from cutting the rubber. But I don’t mind if people want to do it themselves. I just help them however I can.
PR: Anything else to add?
JA: We’re getting a lot of glass out of China right now, and I can honestly say that I haven’t had a lot of trouble with Chinese glass. Not like the glass we used to get from Argentina - that was always a problem. But my suggestion to anyone is to buy local, because the shipping can cost as much as the glass, and if it’s wrong, you have to ship it back wherever you bought it from.
|
| Click on any item below for more details at Amazon.com |
|

|
|
Dennis W. Parks
The Complete Guide to Auto Body Repair
Motorbooks, Paperback, 2008-08-15 |
|
In The Complete Guide to Auto Body Repair, Dennis Parks shows you the tools, materials, and techniques that will successfully get you through the bodywork process, repairing damage from collisions, neglect, and rust.
Dennis Parks has also written How to Build a Hot Rod, How to Plate, Polish, and Chrome, How to Restore and Customize Auto Upholstery and Interiors, and How to Paint Your Car.
|
|
Tom Brownell
How to Restore Your Collector Car
Motorbooks, Paperback, 1999-12-24 |
|
This book has a great deal of information on selecting a potential project car and setting up the workshop, plus a lot of detail on cleaning, stripping, blasting, derusting, bodywork and trim restoration, but comparatively less (just 1 chapter) on engine and mechanical restoration and 1 chapter on brakes. The book includes many nice color photos, however, and would be a good addition to a restoration library.
|
|
Greg Donahue
How to Restore Your Muscle Car
Motorbooks, Paperback, 2005-11-07 |
|
This book covers all aspects of restoration in detail, with a focus on the special issues found in 1960s and 70s muscle cars. From car selection through engine and interior restoration, this book is full of photos, illustrations, and step by step procedures. Examples are given from all domestic automakers. Reviews have been generally positive, for example (from AutoWeek): “With clean vintage muscle cars skyrocketing in price, this second edition has good timing, providing updates on parts sources and restoration techniques. We didn’t use the book to restore a muscle car, but we found it clear and concise, with user-friendly disassembly diagrams and 1,300-plus step-by-step photos, from choosing tools and which muscle car to restore, to completing the restoration.”
|
|
Jeff Lilly
How to Restore Metal Auto Trim
Motorbooks, Paperback, 1997-07-12 |
|
This is the book to have if you do a lot of trim work. Sections cover safely removing trim, marking flaws, repairing flaws, sanding and buffing, and unusual trim pieces made of copper, brass, aluminum, and so on. The book is photo-rich and includes detailed instructions on repair and restoration.
|
|
|
|