|
In the world of auto restoration, metal trim is the unexpected challenge. Not only is trim difficult to find and match if you’re missing a piece, but it’s very delicate and easy to damage. Many first-time restorers, full of good intentions, have waded in and ruined virtually all their trim during the removal process. Then they face the long, hard job of finding and buying new trim (which may be damaged itself) or paying to have the old trim repaired.
The first rule of trim is DON’T. You have to remove it eventually, but don’t dive in with a screwdriver or pry bar and just yank it off. You might bend it, rip it, dent it, or scratch it if you do that. Almost as bad, you may damage otherwise good trim clips.
If you’re restoring a domestic car from the 1950s or later, chances are you can pick up a trim removal tool at the auto parts store. But automakers have used as many different methods to attach trim as there are stars in the sky, and sooner or later, you’re going to find yourself facing down a piece of perfect, irreplaceable trim that has to come off in order to do a good job on your paint and bodywork. It’s not just about getting paint up under the trim--you won’t be able to get that piece media blasted or dipped with that trim still attached!
When that happens, your first course of action is research and advice--talk to your club and search the Internet for tips and tricks for your particular car. No matter how rare your car, you’re not likely to be the first person to face this challenge. Secondly, you can take the job to a professional and pay to have it done. It might hurt a little to pay for such a simple task, but $50 to have the trim removed intact is better than hundreds to buy replacements for your twisted mess of formerly decent chrome!
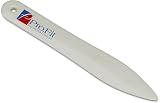
If you do it yourself, be sure to use the right tools. Plastic and steel tools designed explicitly for removing trim are indepensive (see the ads on this page). In any case, the key word to remember is careful. Work slowly, with plenty of time available to consider each trim clip individually. Even between two clips of the same design, one could be loose and half-broken already while the other one is tightly wedged into place. If you’ve got any trim already off the car, examine it closely and try to figure out where to push, pull, pry, or poke to release the clip harmlessly. Every clip has a proper method, and the key is to find the one that works for your car.
When you get the trim loose, you’re not out of the woods yet. You need to store it, potentially for a long time, and lots of trim gets ruined after being strapped together with tape and tossed onto a shelf. I like to use long cardboard tubes with plugs in the ends. Not coincidentally, that’s how trim is generally shipped. Talk to your local body shop and see if they have extras of these tubes you can purchase or scavenge.
When you’re ready to restore your trim, it’s a satisfying job. Typically, while your car is getting its body and paint done, you can work on your trim. Make sure you know if your trim is chrome, stainless steel, or aluminum. Some cars use all three in different locations! Get the right polishes and pads to scrub them clean and burnish out the scratches. If your trim is chrome-plated, you might need to have it replated, but stainless and aluminum should shine right up.
Be careful not to bend or dent the trim during this process. Because it’s bright and shiny and rather delicate and brittle compared to mild steel, you can’t really work out a dent like you can with a fender or door skin. If your trim is damaged, don’t try to be a hero -take it to a professional for repair.
When you go to reinstall your trim, I guarantee that you won’t have all the trim clips you need. Even if your car had them all when you started, some will break and more will get lost. New trim clips don’t cost much, and they’re not brittle with age. Many online sources have replacement trim clips for most domestic models back to the 1950s at least (see the external links on this page).
If you’re careful, your trim and brightwork will be a point of pride on your restoration. Just take your time, don’t cut corners, and do the job right and you’ll be rewarded.
|
 |
DO |
- Use the correct trim removal tool, if possible
- Take your trim removal to a professional if you doubt your ability to remove it safely
- Store your trim in a secure and protected manner
- Polish and restore your trim with proper materials for the alloy
- Install your restored trim with fresh clips
|
 |
DON’T |
- Don’t pry your trim loose with a screwdriver
- Don’t pull the trim so that the clips break
- Don’t try to have a panel blasted or dipped with trim still attached
- Don’t try to reinstall the trim with compromised clips
- Don’t leave clip locations empty because you have too few clips
|
|
|
Removal
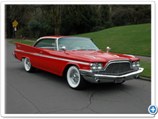
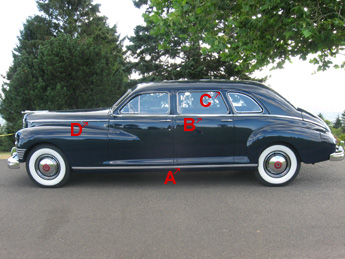
Removing the trim from the Popular Restorations project car was fairly easy, but there were still a number of challenges. There are stainless steel trim strips on the rocker panels (marked by “A” in the photo).
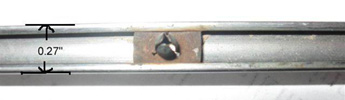
The clips on each end had threaded studs with nuts that were accessible from inside the fenders. The remaining clips went into holes in the rocker panels so I couldn’t see whether they were spring clips, threaded, or otherwise. I tried prying the trim gently but it wouldn’t budge--either it was screwed in or the clips had rusted to the body. With patience, I tried prying here and there and finally one of the clips released so I could see they were indeed spring clips. With that information I had enough courage to pry a little more aggressively to remove the strips from the car.
As a rule, the smart thing to do is look at the parts manual to see what types fasteners are used. However, I wasn’t able to find that information in my book--I just looked again and I still don’t see them listed.
The stainless beltline trim (marked “B” in the photo) came off easily. But the chrome hood trim (marked “D”) was another story. You would think it would be snap as all of the threaded studs were accessible. But they were also very rusty, possibly from the engine heat or fumes. Nearly every one of them had to be destroyed--I used a drill with a small bit, pointed at an angle between each stud and nut, and drilled one by one until they released.
I was wishing the Packard Custom Super Clipper didn’t have so much trim when it came time to remove the skinny stainless strips that go around each side window. It was scary prying them off as they are so delicate.
Restoration
All of the trim needed to be buffed (stainless) or replated (chrome) so I took it to a plating shop. They charged $8 per foot for buffing but took pity and charged less for the side window trim. As I remember they billed for 100 feet of stainless, which included the pieces that go around the front and rear windshields.
Replacement
When it came to finding new clips for the trim I had good luck and bad. On eBay someone was selling the large spring clips for the rocker trim (see the rightmost clip in the photo).
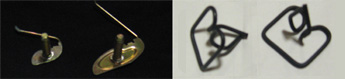
The other clips pictured were available at NAPA. That just left the ones I needed for the side window trim.
I looked everywhere for these tiny side window trim clips and finally gave up. I replaced those that were missing with small flat-head rivets and used a tiny bit of epoxy on each one which worked out well.
Instead of using spring clips on the beltline trim I used screw on clips and tightened each one down with a rubber grommet, a stainless steel washer, and then a stainless steel nut. The grommets keep the water from running inside the doors--and I used stainless so the nuts won’t rust. Harbor Freight sells stainless nut/washer samplers that are far cheaper than buying them one-by-one at the hardware store.
For the places where I did use spring clips, I surrounded the prongs with 3M strip caulk (aka dum-dum), also to keep water out of the holes.
|
|
Susan Fisher
http://www.cliphouse.com
1-800-229-2547 ext. 381
PR: What do people need to know about finding trim clips?
SF: We carry and can get most trim clips and similar parts, and we’ll go out and find parts that people need. We’ve been in business a long time and we have those connections. The manufacturer’s catalogs have up to 15 pages of clips just for GM cars, and it’s the same for Ford and Chrysler. And then, the manufacturers will drop old-style clips off their catalogs. Frustration comes in with the fact that they’re not making new ones and you have to go to a salvage yard, and those aren’t in better shape than the ones you already have.
PR: What about older cars?
SF: We sell to a lot of restoration shops. What you can do is, if you can’t find a part, we can source it in an amount that an individual restorer would need. We can get a single package, rather than 6 or 7 packages as a minimum order.
PR: How many clips do you carry?
SF: We carry a lot more than shows up in our online catalog. We have between 10,000 and 14,000 parts in our warehouse. Where we try to be helpful is to source and purchase the right parts that people need, even when they’re out of circulation.
PR: Do you carry other products besides trim clips?
SF: We carry a large variety of restoration parts. We’ve got the old glass fuses, star washers, both internal and external. What’s very popular right now is our cables, because you don’t find those in catalogs any more. We’ve got E-clips in assortments and individually, and we’ve got body bolts. We’ve got lamp pigtails and sockets, too. If it’s still being manufactured, we can pick it up for you.
PR: Anything else to add?
SF: We have a catalog that shows our top 2,000 products, and we distribute that catalog free. Just call us to order one. And our website will be updated shortly, and it will be much more complete and easy to navigate.
|
| Click on any item below for more details at Amazon.com |
|

|
|
Jeff Lilly
How to Restore Metal Auto Trim
Motorbooks, Paperback, 1997-07-12 |
|
This is the book to have if you do a lot of trim work. Sections cover safely removing trim, marking flaws, repairing flaws, sanding and buffing, and unusual trim pieces made of copper, brass, aluminum, and so on. The book is photo-rich and includes detailed instructions on repair and restoration.
|
|
Dennis W. Parks
How To Plate, Polish, and Chrome
Motorbooks, Paperback, 2006-11-15 |
|
Aluminum and steel can be polished, chromed, anodized, plated, and painted, and this book shows enthusiasts how to do it. The book includes what is required, what it will cost, when to use different processes and whether to have a professional do it or tackle the project at home. Applies to cars as well as motorcycles.
|
|
Actron
Actron CP5011 Panel, Trim and Molding Removal Set
|
|
Includes five tools for easy removal of fastener, molding, wheel hubs and more. For use on internal and external vehicle molding and trim fasteners. Plastic construction of tools prevents scratching and damage to vehicle paint, leather, chrome and other surfaces.
|

|
Anytime Tools
7 pc CAR DOOR PANEL, TRIM & Windshield REMOVAL TOOL
|
|
Remove auto door panels and trim without damaging the connectors with these tools. Designed to fit most makes and models. Includes a square notch door panel remover, V notch door panel remover, curved V notch door panel remover, window and door handle remover, and a trim pad remover.
|
|
Bojo
4-Piece General Combination Kit
|
|
General-purpose plastic pry tool kit with four useful tips on a comfortable, ergonomic handles. Removes body trim, emblems, switches. The kit’s triangular shaped handle fits the human palm for push as well as pulling operations.
|
|
|
|