Assembling a car by hand is an amazing learning experience. By the time you’re done, you will have touched every nut, bolt, and part in your car. You will know where every wire leads, where every tube is connected. You will be an expert on your car, and if you’ve done it right, on your year, make, and model. It’s a singular experience and when the car fires up and runs on its own power, you will feel justifiably proud.
That’s the end of the story, but chances are you’re still back at the beginning, with your car in a million pieces all over your shop. If you’ve been following our procedure from the beginning, you’ve carefully photographed everything before you disassembled, you carefully sorted and labeled your hardware, you had everything cleaned, crack-checked, coated, painted, plated, and rebuilt as necessary. Now it’s all back from the shops and it’s time for you to put it all back together.
If you’re lucky, you’ve got a factory assembly manual for the car, or a correct example to work from, or at least a really good set of notes. If you’re not lucky (like most of us), you’re going on common sense and a fervent hope that you don’t have too many parts left over when you’re done.
The main thing to remember as you assemble your car is that all the investment you’ve made so far will be enhanced or wasted based on the work you do at this point. So take it slowly, be sure of what you’re doing, and be ready to redo things if necessary to get them right.
Virtually all resources will tell you to start by putting the suspension onto the frame of the car. That’s good advice, because then you have a moveable platform on which to assemble the rest of the vehicle. You should also install any hard lines for the brakes, clutch, or fuel system at this time, and any wiring harnesses that are easier to install before the body goes on.
Much of your assembly order will depend on whether your car is a uni-body (also called monocoque) design or body-on-frame. If your car is a body-on-frame design, you can usually install the entire engine and drivetrain easily before the bodywork goes on. This is a big advantage because it’s so easy to damage paint and bodywork and especially engine bay paint and sheet metal when you’re manhandling an engine and transmission into place. The increased access afforded by not having the body on the car also means it’s easier to install the driveshaft and potentially the fuel tank and lines.
If you have a unibody car, you’ve got more problems. Because the body and fenders are likely to be an integrated whole, you need to rethink the usual order of assembly and make sure it works for you. For example, you may find (depending on the specific make and model) that it’s much easier to install the wiring harness and all hydraulic and fuel system lines before you clutter up the engine bay and transmission tunnel with the engine and transmission.
Certain monocoque designs such as the GM F-Body (Chevrolet Camaro and Pontiac Firebird and Trans-Am) use a body/chassis design with a detachable front frame segment and separable front fenders and fascia. This allows you to install an engine and transmission without worrying about hitting the fenders or engine bay, but in a more traditional unibody design (found on many foreign sports cars since the 1950s) you have to be careful and work around the fenders to install the drivetrain. You also have to do a good bit of the work (such as installing the driveshaft) from the underside of the car.
But once you’ve got the main guts of the car installed and the bodywork on, you can move on to the interior. By now your wiring harness should be installed, and you can start making all the connections under the dash. Wherever possible, I like to attach ground wires first, because it’s so easy to miss a single ground wire when everything else is attached and the space behind the dash becomes limited. You can also run wires for interior lights and door-operated switches more easily now than later. When you’ve got all your wiring and ductwork finished, you can go ahead and install the carpet, headliner, and your interior panels. Finally, install your seats, seat belts, and trim pieces. Only then do the doors go onto the car.
Doors can pose several special problems. I like to assemble doors completely and then install them as a unit. But assembled doors are heavy and often difficult to align. I use a good floor jack, well-padded with towels, to hold up the free end of the door while I find the right combination of shims, adjustments, and striker plate orientation to get the door to fit well with the other bodywork, open easily and shut smoothly.
After the interior is assembled, it’s safe to work on windshield glass and rear window glass. I leave these for close to last because it’s often easier to get at the dashboard and headliner areas if you have access through the windows.
Last of all, install the hood, trunk lid, and the exterior bumpers and trim. Don’t get excited towards the end of the process and rush things! Trim goes on last, but it’s very easy to damage, or it can slip and scratch your paint, so take your time right to the very end.
You can reasonably expect to spend weeks on a careful assembly, so don’t leave it to the day before you want to use the car. Also, be aware that you’ll need to have the steering aligned, brakes tested and bedded in, and probably 100 other shakedown problems to fix before the car is really and truly finished.
|
 |
DO |
- Take your time, test fit everything, and be sure you’re not “painting yourself into a corner”
- Stop or work on another area if you’re not sure what fasteners to use
- Use several layers of low-tack masking tape to protect paint and bodywork while you work. Blankets work well, too
- Get a good set of ¼-inch, 3/8-inch, and ½-inch torque wrenches and look up the torque specs on the fasteners you’re using to assemble your car. Rattles and buzzes are hard to track down later, and broken bolts will cause you no end of trouble
|
 |
DON’T |
- Don’t hurry or get careless as you approach the end of the assembly
- Don’t leave off supports, braces, brackets, covers, and so on. The factory spent the money to put them there for a reason
- Don’t undertorque or overtorque fasteners
- Don’t forget to fill the transmission and rear end with oil!
- Don’t forget to connect ground wires
|
|
|
I finally had to give up estimating a completion date for the Popular Restorations feature car. For the last three months of the project I thought I was less than two weeks from completion!
And now, looking back, I can see why. Assembly for the Packard took nearly 500 hours whereas disassembly took only 125 hours. At the outset, I had guessed the ratio would be about one to two--not one to four.
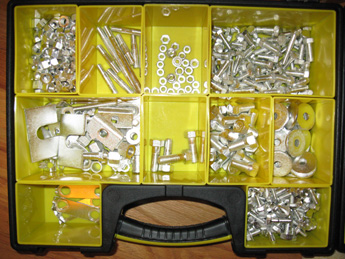
One of the most frustrating aspects of the process was opening up boxes only to find that yet another overlooked part, or set of parts, needed to cleaned and painted before the assembly could continue. Another frustration was shuffling through bins of fasteners looking for the right nut, screw, or bolt. I separated them into four organizers, as pictured above, after plating but that helped only a little.
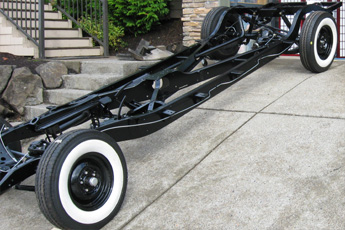
What did go well was the restoration of the chassis. Although time consuming, the process went along, more or less, according to schedule. I think it gave me a false sense of security as to how the rest of the restoration would go.
When putting the body back on the frame, I think I must have shimmed, tightened, torqued, and removed the 20-plus body bolts three or four times to get the panels to line up just right and for the doors to open close properly. One lesson is learned is that shimming the body bolts by a door-hinge pillar is the fastest way to change the vertical alignment at the door latch. Knowing that made the body installation process much easier.
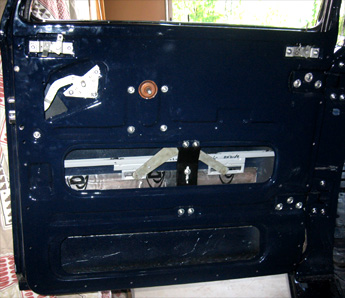
The doors were another assembly challenge. Each one took the better part of a day to put together. I decided to let a restoration shop install the fuzzy weather stripping that goes on each side of the windows at the beltline. I wanted them to look good--not as thought they were a first-time effort.
I’ve covered the assembly process in detail for many topics. For example, see the Glass page for more on the Packard’s glass assembly. So I’ll finish this article with the best assembly advice I can offer to first time restorers. Advice that is more psychological than procedural: Proper assembly can take many months; plan on taking far longer than you expect. In that way you will be less likely to get discouraged. Losing your enthusiasm near the end of a restoration can lead to haphazard workmanship or even the decision to sell your car in a basket. Closure is a challenging part of any project. Proper planning and generous estimates can help keep your enthusiasm high throughout the last phase--and help you to get your car back on the road (or in its trailer to the next show).
|
|
|
Greg Wagner
6210 SW Lakeview
Lake Oswego, OR
(503) 740-3463
PR: Take me through the assembly process when you’re putting together a restoration.
GW: First of all, you’ve had the car together about three times before you go for the final build. You’ve had it apart and back together to make sure everything fits right. You’ve got all your nuts and bolts bagged and labeled so you know which bolts are used on which fender and so on. The first thing I do is get the suspension on the frame, then the motor goes in and the exhaust. Then I put the body shell on the frame. I try to work in the same order as when the car originally went down the assembly line.
PR: There’s some “fudge factor” in placing a car body on its frame. Many people who have performed frame-off restorations have trouble getting everything to fit correctly when they reassemble. How do you handle that?
GW: When I pre-fit the car after the bodywork is done and before it gets painted, I set up all my shims and I mark them and put them in baggies. So everything’s labeled for location. Then when I assemble the car, I leave the body bolts snug but not tight so I can move things around and get the gaps I want.
PR: Where does wiring fit into this process?
GW: The wiring goes in after the body goes on but before the fenders and doors go on. That’s so you’ve got plenty of room to work and you can get your pigtails in their proper locations before the sheet metal goes on.
PR: Is there anything you do to protect painted parts during assembly?
GW: I put low-tack masking tape down over everything, sometimes two or three layers in critical places.
PR: When assembling a car, do you use a factory shop manual for torque specs or do you just use the standard SAE torque specs for bolts of a given size?
GW: I use both on occasion. I use assembly manuals quite a bit. It’s not uncommon for me to get a car in pieces, so I frequently don’t get a chance to take pictures or sort the fasteners as I’d like. I’ve gotten more cars that way than you can imagine. And it’s not uncommon to take cars apart and find bolts that are so rusty that they break right off. Sometimes you’re better off to just cut them.
PR: What about glass?
GW: Glass is one of the last things I do. You get the doors on and get all the interior in and then you can start on the glass. There’s no rule of thumb on it, but you have to take the time and make sure it fits right. The more you do it, the more you know how to do it.
PR: Is there anything surprising or that people wouldn’t expect in assembly?
GW: Not really. People want everything to fit and look nice and the gaps to be right, for the windows to go up and down and for the keyways to work smoothly. And over time, body panels will move on you, as the cars heat up and cool down. And manufacturing standards are better now than they were -the tolerances used to be much greater. The assembly manuals will tell you the tolerance. I once restored a 1970 Oldsmobile W30 442 convertible. In the assembly manual, it said that gaps of up to ¼-inch were acceptable. It said that an 1/8th of an inch at the top of the fender and a ¼-inch at the bottom of the fender at the door is an acceptable fit.
|
| Click on any item below for more details at Amazon.com |
|

|

|
Wayne Scraba
Practical Fabrication and Assembly Techniques: Automotive, Motorcycle, Racing
Motorbooks, Paperback, 2010-08-15 |
|
This book guides enthusiasts through the most essential processes for assembling a high-performance engine, car, or motorcycle. Tasks like fabricating mounts for fuel pumps or ignition boxes, selecting fasteners and hardware for securing components, and plumbing brake and fuel systems are among the many topics covered.
|
|
Chilton
Automotive Tools Manual
Thomson Delmar Learning, Paperback, 1999-01-15 |
|
This is a guide to buying and using more than 500 automotice tools. The emphasis is on what exists and how to buy more than how to use.
|
|
Chilton
Automotive Reference Manual & Dictionary
Thomson Delmar Learning, Paperback, 1999-01-15 |
|
This reference manual includes a dictionary of more than 2000 automotive terms and sections on decoding vehicle identification numbers, automotive math, and tool and fastener guides.
|
|
Jeff Killingsworth, Eric Godfrey, John H. Haynes
Suspension, Steering & Driveline Manual
Haynes, Paperback, 1999-01-15 |
|
An excellent book on suspension, steering and drivelines for foreign and domestic cars and trucks, front/rear-wheel drive vehicles, and performance modifications.
It has sections on rebuilding front-ends, replacing shock absorbers and struts, overhauling differentials, replacing driveaxles and boots, and improving your vehicle’s ride and handling. Wheel alignment specs are included.
|
|
Chilton
Haynes Automotive Brake Manual
Thomson Delmar Learning, Paperback, 1999-01-15 |
|
This is a guide to do-it-yourself brake repair including hydraulic component overhauls and step-by-step brake pad and shoe replacement.
|

|
Haynes
Haynes' Automotive Electrical Manual
Thomson Delmar Learning, Paperback, 1999-01-15 |
|
A complete guide to electrical system troubleshooting, repair, maintenance and rewiring. Clear step-by-step instructions and hundreds of photos show you how to do a professional job yourself.
|
|
Loctite
Loctite - 243 Blue Threadlocker Oil Resistant/Medium Strength, 6 ml. (37419)
|
|
Loctite 243 Blue Threadlocker is a general-purpose, medium strength threadlocker with improved oil tolerance. For fasteners between 1/4” and 3/4” (6mm to 20mm). Parts can be separated using hand tools. Suggested applications: Rocker studs, rocker adjustment bolts and bolts on valve and cam covers, oil pans, disc brake calipers, intakes and alternators, and pulley assemblies.
|

|
Permatex
Permatex 85080 Power Bead #598 Ultra Black OEM Hi Temp RTV
|
|
Retains high flexibility, oil resistance properties through use of a patented adhesion system. Meets performance specs of original equipment silicone gaskets. Temperature range -65F to 550F intermittent, resists auto and shop fluids and vibration. Suggested Applications: Valve covers, oil pans, intake manifold end seals, timing covers, transmission pans.
|

|
Permatex
Permatex 81343 Anti-Seize Lubricant 133
|
|
Temperature range: -60F to 1600F. Salt, corrosion and moisture resistant. Suggested Applications: For easy removal of spark plugs, cylinder head, exhaust head bolts, and more.
|
|
|
Permatex.com has training videos for gasket sealers, thread lockers and more.
|
|
|