|
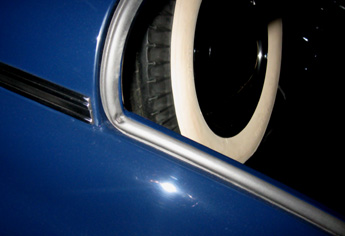
One area that is often overlooked in B-grade restorations is the car’s weatherstripping and seals. There are a number of reasons for this -finding the correct seals and connectors can be a serious challenge, installation is a little tricky at times, and finally, weatherstripping is generally designed not to be seen when the car is on display or driving.
But with a little work, you can find the right part (or something close to it) and install it yourself with good results. Your reward will be a car that stays dry, reduces wind noise, and can pass the most detailed inspections with flying colors.
Most weatherstripping slides over a ridge or slides into a channel. Sometimes the strip is glued or screwed into place. The key to getting your weatherstripping right is to buy the right stuff, and that’s a function of the strip’s cross-section.
Generally speaking, the strip will have a part that connects to the car and a part that is hollow or soft enough to conform to the surrounding metal when the door, window, hood or trunk lid is closed. Sometimes that hollow part is directly on top of the connecting portion and sometimes it’s positioned off to one side. Sometimes the hollow part is a smooth cylinder, and other times its got some shape to it, or flaps in the surface.
Popular makes and models will have extensive documentation of the correct weatherstripping, and it will be commonly available, but if you have a rare model, you might have to hunt around for weatherstrip that is “close enough.” Some cars, such as my own Alfa Romeo Berlina sedan, came with a very distinctive weatherstrip with a maroon velour-covered attachment portion. That stuff is simply No Longer Available (NLA) so right away, I’m looking for something that will work and look good.
Your best bet in matching weatherstripping is to find a sample of the original, correct product. Bear in mind that the strips in the car may have been replaced at some point, so if you’re not sure it’s the original part, it’s best to ask around and find a sample. Take a short cut of the sample and a measurement of the total length required with you when you shop, or have it with you when you shop online. If you end up talking to someone on the phone, be prepared to measure key dimensions of the strip with a reasonably accurate ruler or calipers.
 |
|
Hint... |
|
Nothing grips like real weatherstrip adhesive. You’ll find a thousand uses for it once you try it. Just don’t get it on your paint or upholstery.
|
If you have the right product, installing the weatherstripping is easy. Just note that if your weatherstrip presses on and clamps onto a ridge or seam, you’ll want to perform that process carefully to ensure a good grip. One potential problem is that if you don’t have the right product, it may not be the right size or shape to grip the attachment point. If your strip requires glue, use proper 3M or other quality weatherstrip adhesive. Use a little care and you’ll get great results every time.
|
 |
DO |
- Pay attention to restoring your rubber and felt seals and weatherstrips
- Make the effort to get the right products
- Take a sample of the original with you when you shop or go online to find replacement products
- Install the new weatherstrip carefully
|
 |
DON’T |
- Don’t just yank the old strips out and throw them away
- Don’t use any old rubber strips - they are not all the same!
- Don’t get weatherstrip adhesive on any other surfaces
|
|
|
For window weatherstripping see our Glass page.
I was apprehensive about installing the door and trunk weatherstripping on the Popular Restorations feature car. I didn’t want to end up with crooked strips or globs of glue on the paint.
Steele Rubber had the rubber for the doors and the trunk for a little over $400. Their replacement rubber isn’t molded all the way around the doors like the original. Their front door kits had some molded pieces for the bottom of the door but the rest was just universal weatherstripping.
For the Packard Seven Passenger Sedan rear doors, Steele Rubber did not offer kits--just universal weatherstripping. I noticed that the molded parts from the front doors would work on the back and was able to purchase them separately.
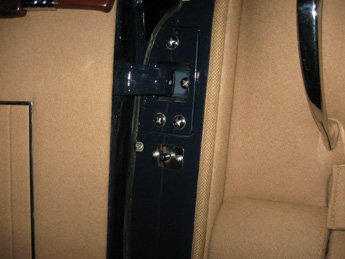
For the pillars at the front of the doors, Steele Rubber had reproduction rubber for the front only. I was lucky that the rear pillar rubber was still in good shape--I cleaned, dressed, and reinstalled it.

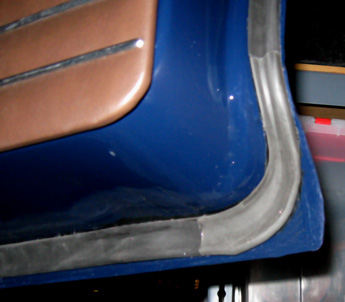
The trunk was easy. The biggest problem was managing the long piece of rubber while trying to get it fit properly. I like the way it turned out.
Adhesives
The first tube of weatherstripping cement I bought was 3M Weatherstripping Adhesive (black). To make a long story short, I accidentally bought yellow when I purchased the second tube. 3M claims that yellow has better adhesive qualities for doors and trunks--here’s a quote from their website:
Yellow formula for adhering all types of rubber weatherstripping to car doors and trunks. An excellent adhesive for bonding engine gaskets. Black formula is a strong, flexible, rubbery adhesive that withstands vibration and extreme temperature variations. Primarily designed for use on t-tops, moon-roofs and sun-roofs.
But I’d never buy yellow again. It was more difficult to spread than the black. And furthermore, the black doesn’t show up where the rubber meets metal.
To apply the black adhesive I squeezed a string onto the weatherstrip, a couple feet at a time. I found if I tried to apply too many feet of adhesive at once it would start to set up before I could spread it around on the rubber. Then I did the same to the metal on the door, wiping up any mistakes with solvent. To do the spreading, I used my index finger while wearing rubber gloves. I used NAPA Silicone and Wax Remover although 3M recommends their own solvent.
Now here is where the installation got easy. You are supposed to wait a few minutes until the cement is tacky on both surfaces and then press them together for a bond. That way when you are installing the rubber, the glue is not really sticking to anything it shouldn’t. If you press lightly at first, it is easy to make adjustments. Even if you have to tear apart a completed bond, it seems to come apart fairly cleanly and you can just repeat the process.
When I was visiting Custom Automotive Restoration the owner told me to use super glue on the ends of the weatherstripping. You can see where I had to glue the strips to the corner molded piece at the bottom of the door. My only advice is to be very sparing--the glued joint looks better if the glue isn’t smeared onto the visible surface.
All in all, weatherstripping was easier than I thought it would be. The adhesive is much more forgiving than contact cement and after some adjustments I was happy with the results.
|
|
Matt Agosta, President
www.steelerubber.com
800-447-0849
PR: When people call you for rubber seals and weatherstrip, do you generally sell a standard part, or are these correct original replacements?
MA: We do both. The vast majority of parts we sell are direct replacements. But we also have a line of universal products made especially for fiberglass hot rods, and we have applications for early cars that didn’t have rubber originally, but where the owners now want them to seal.
PR: What range of cars do you support?
MA: As far as our range, right now we make parts only for American cars. But we cover all major American makes -GM, Mopar, Ford, and many of the independents such as Packard, Studebaker, Crosley, and Duesenberg. The vast majority of our products fit cars from the 1920s to 1990s. We’ve just finished a variety of parts for 1980s and 1990s cars. But at the same time, we can’t do them all.
PR: When you decide to make rubber seals for a given car, do you use original specs or take a sample and reproduce it?
MA: We find an original part and recreate it. Usually it’s a customer requesting us to make a part and they supply the original sample. We reverse-engineer and redesign the pieces to make the mold and the parts. Everything we make for special applications is made from original. The information is just not there for older cars. I can only think of one part of all our 9,000 where we had a design that was brought to us.
PR: Some seals have a felt, cloth, or velour covering. Do you reproduce those?
MA: We do put some velour coatings on, but not in colors. We do it when it’s practical or when we have to. We stay away from a lot of colors, because it narrows the market way down and raises the cost for the part. The problem with rubber parts is that all the investment is on the front end, and it’s a slow return. We can do it because we’ve been doing it for 50 years and we’ve got a lot of molds from years ago to help pay for what we’re doing today. We do make some brown rubber parts, especially for Mopar and GM cars from the 1930s and 1940s, when we have enough demand to make a small batch of brown rubber.
PR: Tell me something that’s not obvious about restoring rubber parts?
MA: First thing - can you even get a replacement part? I’ve had customers who took their cars all apart and got way into it, and then they can’t find the replacement parts. So number one, do your research. And number two, don’t throw anything out because you might need a sample. You need a long timeline if something does need to be made. If your make and model are rare, you might have to put some money out to get it done.
PR: How long does it take to have custom rubber parts made?
MA: First of all, if we didn’t have a part and we didn’t have a lot of call for that part, it wouldn’t be a high priority, so we’d look for a substitute part. If it’s something we think we’ll have a market for, then we schedule the tooling. It could take 6 months to a year, or if it’s complex, 18 months to 2 years.
PR: How much should someone expect to pay for custom rubber parts?
MA: We can give a quote to have it made up, and the next break we’ve got in the tooling, we can get it in. Depending on the complexity, we might get it done in 6 weeks or several months. It’s tough to give a price without seeing a part, but a typical mold will run $2500 to $5000. But if it’s complex or a bigger part, that’s more.
PR: What message would you give to people considering starting a restoration?
MA: I would say that if you’re restoring a car that’s a much more popular model, something more mainstream, you’ll find a lot of parts on the market. If you do a Henry J [Kaiser], you need to do more homework, but there’s a lot out there these days. There’s more available and more companies like us who can make a part for you. We want to make this an enjoyable process, rather than a frustrating event. Sometimes universal rubber will work just fine. For example, with a Henry J or a Studebaker, independents often used the same suppliers as the Big 3. Just don’t go into it blind.
Finally, I’d tell people that we’ve got excellent customer service people who are happy to help them get the parts they need.
|
| Click on any item below for more details at Amazon.com |
|

|
|
K. Henson
Car Interior Restoration Manual
Haynes Publishing, Hardcover, 1995-05-14 |
|
This book is filled with advice on feeding and maintaining leather upholstery, repairing seat frames, renewing trim panels, curing water leaks, re-coloring vinyl trim and much, much more.
|
|
John Gunnell
How to Restore Automotive Trim and Hardware
Motorbooks, Paperback, 2009-07-15 |
|
When it comes to restoring classic cars, the devil is often in the details--specifically, the small pieces of decorative trim and hardware. In this book one of the best auto restorers around provides step-by-step instructions for getting those essential details just right.
|
|
Dennis W. Parks
How to Restore and Customize Auto Upholstery and Interiors
Motorbooks, Paperback, 2005-09-29 |
|
This book primarily focuses on creating custom upholstery and interiors for hot rods, but the basic practices are all the same, and the techniques apply well to any restoration job. Seat uphostery, dash, headliner, and interior panels are all covered.
|
|
Tom Benford
The Complete Idiot's Guide to Restoring Collector Cars
Alpha, Paperback, 2004-08-03 |
|
The first 150 pages of this book are dedicated to the process of finding and deciding upon a restoration project and determining your restoration strategy. This part is covered in detail, and covered very well. The last 50 pages or so cover what to do with your car after the restoration is done, which leaves just over 100 pages to cover the actual work. For example, the chapter on engines assumes that the basic mill is in good shape, and simply covers tuning, carb adjustment, and freshening the engine bay. This is not a step by step mechanical manual - but it offers some of the best coverage on every other aspect of restoration.
|
|
|
|