|
Everyone who has spent time around old cars has experienced electrical “gremlins”--those mysterious failures and strange behaviors that come and go. Typically they come when you need to use the car, and they go when you take the car to the mechanic to have him figure out what’s wrong!
The source of many of our woes is simply the age and quality of the wiring in a classic car. For the most part, the wiring in a classic car was made to last for 5 to 10 years. If your car is 50 years old (or more), then chances are good that the person who designed the electrical system would be surprised that it still works at all.
The sources of failure in old wiring are numerous--cracked insulation, bad grounding, loose or corroded connectors, and increased resistance in the wire due to corrosion are the most common culprits for wiring troubles.
When you go to restore your wiring, you have an important decision to make: to restore or to replace. Replacing is generally the easier task, if you can get an accurate wiring harness from a replicator. Be prepared to pay handsomely for a replacement harness, but when you’re done, you can have confidence that your new harness will function as designed for the foreseeable future.
If you decide to restore your existing harness, be prepared to put in many hours. The best bet is to photograph and label every wire, and then completely remove the harness from your car and lay it out on a table made with a full sheet of plywood. This will allow you to see the entire harness and note where it’s been cut or spliced before. You can clean all the connections and inspect and repair the individual wire insulation and the looming before you reinstall. Be sure to inspect and replace wire ends that are weak or bent! You may need to get out your soldering kit to do this, as many old wiring harnesses use soldered ends rather than crimp-on connections.
While the wiring is on the table, go through with your voltmeter and check the connectivity and resistance in every circuit. You may find shorts due to melted, chewed, or abraded insulation that’s hidden in the looming, and you may find increased resistance due to corrosion inside a wire’s insulation. This is a problem associated with wires made up of many small strands of copper, which make up the bulk of automotive wires.
Many enthusiasts set out to restore their old harness, but when they get into the reality of their existing wiring, they find that it’s worth the money to invest in a replacement harness. There’s no shame in that, but on the other hand, you might find that your existing harness is in pretty good shape!
When you install the harness -whether new or restored--pay special attention to your ground points. Try to connect the wires to the original grounding points, but on many cars, the builders just used the nearest screw or bolt into the bodywork. Alfa Romeos are particularly notorious for inventive and unlikely grounding points, such as grounding a gauge to the bracket that holds it in place behind the dash. Where it’s possible and unobtrusive, you can consider improving grounds--just make sure you get the best possible connection to bare metal.
As you install the harness, go back and check your notes about which wires go where. It’s surprising how something that looked so obvious when you were taking it apart gets so confused when you go to put it back together. Your photos and notes will be invaluable now.
When you’re done, you should have a wiring system that allows all your gauges, lights, and engine functions to work as they did when your car was new. Reliable electrical components increase your confidence and enjoyment of your classic car, so this part of the project is well worth the effort it requires.
|
 |
DO |
- Completely photograph and label your wires before you do anything else
- Check every wire and circuit for shorts and connectivity
- Inspect and clean every wire end, replacing worn and damaged connectors
- Inspect and repair insulation and looming throughout your harness
- Consider a replacement harness for like-new looks and function
|
 |
DON’T |
- Don’t just rip your wiring out of the car
- Don’t cut wiring as you remove it - you might need that later!
- Don’t throw out your old wiring until your project is finished
- Don’t crimp on connectors with a pair of ordinary pliers
|
|
|
The wiring insulation in the Popular Restorations feature car had disintegrated in several places under the hood. Under the dashboard it wasn’t nearly as bad but I wasn’t about to do a frame-off restoration without replacing the old wiring.
I checked around with the popular wiring harness vendors and Rhode Island wiring happened to have the 1946 Packard Seven Passenger specifications. I don’t remember the exact price but it was around $1000. The wiring doesn’t come as one harness, in my case there were ten different pieces. Here’s how their website presented the wiring for my make and model:
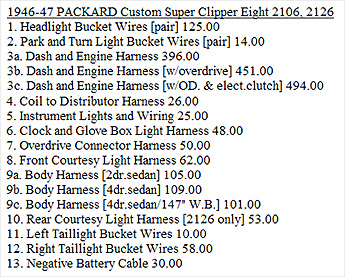
Note that you choose one of 3a, 3b, and 3c; similarly with 9a, 9b, and 9c. In my case it was 3b and 9c. I needed everything else except I already had the negative battery cable.
When it came time to install the wiring I remember restoration mechanic Bob Earls telling me that you install the main harness wires to the back of the dashboard first. Then you push the remainder of the harness through the firewall as you install the dash. Apparently that’s the way they do it at the factory--and it beats working upside down for hours trying to fasten wires with the dash in place.
I looked at the firewall and then the size of the wiring harness and couldn’t believe the harness would fit through its hole. It looked like the harness would have to be fed from under the hood, which would preclude wiring the dash first. But I was determined and (with a friend’s help) tried pulling the large part of the main harness through the hole. Surprisingly, the huge bundle was flexible and, with a lot of persuasion, did pull through nicely. That part ended up working out fine.
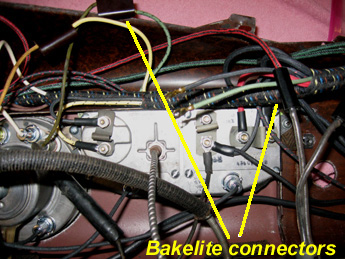
The Bakelite connectors that are used for wiring junctions do not come with the harnesses. The wiring I purchased was also missing the wires that go from the turn signal switch to the instrument panel, the horn wires, the clock wiring, and the wires that go to the courtesy lights at the back of the front seat. What was included were new contacts for the interior and exterior light fixtures and replacement instrument lamp fixtures.

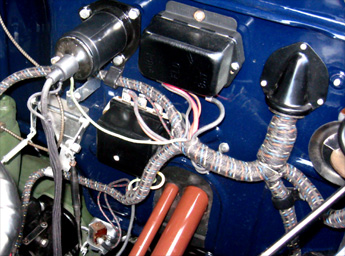
Rhode Island Wiring sells correct-looking wire by the foot as well as terminals and other wiring supplies. So with their help I was able to purchase the supplies needed for the horns and courtesy lights. For the clock wiring and the turn signals and a couple of switches I put clear shrink tubing over the original wiring and heated it gently with a torch. That worked out well as you can see with the clock wiring in the picture above. The shrink tubing adds a layer of insulation and keeps the older insulation from breaking when the wire flexes.
|
|
Brian Tarbet, Manager
333 E. Stuart Ave. Unit A
Redlands, CA 92374
(909) 798-1498
www.ynzyesterdaysparts.com
PR: How would a restorer know if their wiring harness needs replacement?
BT: If it’s a full restoration with an original harness, it’s pretty much a guarantee that the harness needs replacement.
PR: How should a restorer go about this process?
BT: They should first call us and make sure the harness is available. We’ve got over 5500 makes and models we can build, and thousands more we can get from other companies. If it’s not available, we can talk to the customer about removing the old harness.
PR: Do you handle imports as well as domestics?
BT: We handle pretty much anything, import or domestic. The limiting factor is always the connectors. If we have the stuff to do it, we’ll do it.
PR: How do you reproduce an original wiring harness?
BT: We’re unique in the industry, because we take an original harness and lay it on a plywood bench. Then we run nails around the harness to create a jig, and build the new harness right on top of the old harness. This helps us get all the lengths right, and we also have worksheets and instructions to help the assembler get it all right. Then we make kits rather than give every 10-inch piece of wire with its own part number. For example, we’ll make a kit for everything from the dash forward, and then a tail light harness in another kit, and the power seat harness in its own kit.
PR: When you make a harness, do you also match the original wire colors and end tips?
BT: We reproduce over 70 different parts here, and we have over a million feet of wire in stock. We have something like 260 different colors just in the lacquer-coated braided wire.
PR: How about antique wiring with rubber insulation and cloth wrapping?
BT: I wouldn’t dare use OE spec with a rubber insulator. The new stuff is modern automotive wire, which is braided in cotton cloth and dipped in lacquer, so it looks original, but it holds up much better than the OE.
PR: About how much should someone expect to spend on a replacement harness?
BT: Could be anywhere from $200 to $2,000. We sell a Duesenberg harness for $589, but a 1956 Cadillac goes for about $2,600. It all depends on time and materials and what’s required to build the harness.
PR: Any other good advice?
BT: We’ve got lots of good advice in the articles and FAQs on our website. We’ve also got lots of tips and tricks based on the make and model of your car. We’ve been in business for 40 years, and customer service has made our business.
|
| Click on any item below for more details at Amazon.com |
|

|
|
Matt Strong
Custom Auto Wiring & Electrical HP1545: OEM Electrical Systems, Premade & Custom Wiring Kits, & Car Audio Installationsfor Street Rods, Muscle Cars, Race Cars, Trucks & Restorations
HP Trade, Paperback, 2009-04-07 |
|
This book covers electrical theory, wiring techniques and equipment, custom wiring harnesses for racing, hot rods and restorations, pre-made wiring harnesses, special electrical systems (navigational, audio, video), troubleshooting common electrical problems, dashboards and instrument, and trailer wiring.
|
|
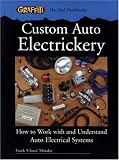
Frank Munday
Custom Auto Electrickery: How to Work with and Understand Auto Electrical Systems
Graffiti Publications, Paperback, 2006-11-14 |
|
Custom Auto Electrickery will help the home-based enthusiast unravel the mysteries surrounding automotive electricals and electronics. Choco Munday explains every area of this field in easy to understand layman’s terms. From a simple rewire to installing and troubleshooting your own engine management system, it is all covered in this book.
|

|
Licota Tools USA
‘Easy Stripper’ Wire & Cable Stripper
|
|
The professional’s choice for quicker, easier wiring projects. An outstanding value with quality design, functionality and durability.
|

|
Chanellock
Channellock 908 Wiring Tool
|
|
Strips AWG wire (sizes 10-22) and mm wire (sizes .80-2.6). Cuts machine bolts without damaging threads (sizes 4-40, 5-40, 6-32, 8-32, 10-32, and 10-24). Crimps both insulated and non-insulated connections. Has the ChannelLock Blue comfort grips.
|
|
Unknown
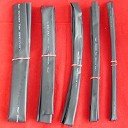
40’ Heat Shrink Large Black Tubing
|
|
Inexpensive, fast, safe, secure way to wrap wiring harnesses. Shrinks up to half of original diameter. Includes 2 each of BLACK 1/4”, 3/8”, 1/2”, 3/4”, 1” in sections of 48”.
|
|
OEM
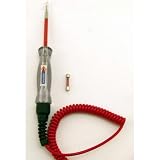
OEM 25886 6-24V Circuit Tester
|
|
This 6-24V Circuit Tester has a bright high intensity bulb for easy visibility, a 12-foot heat and oil resistant coiled cord, and molded strain relief for longer life. Insulated stainless steel probe. Heavy duty grounding clamp. For use on 6, 12, and 24 volt systems.
|
|
SG Tool Aid
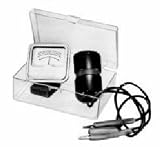
SG Tool Aid 25300 Short Circuit Detector
|
|
This detector works on all 12 volt systems. Use audio signal to indicate when intermittent short circuit occurs. Works with the vehicle at rest or on the road.
|
|
|
|