One of the areas where restorations often fall short is in accurately painting (or not painting) engine and drivetrain components. Careless restorers frequently use the wrong colors, or paint items that were not painted by the factory. Also, because your engine and drivetrain are subject to considerably different conditions than those on the outside of your car, special paint formulations are required to paint these components.
When you’ve got your engine and transmission back from the rebuilders, and your driveshaft has been refreshed and balanced and the rear axle is all clean and restored, take some time and research the correct paint colors and formulations. Old paints frequently used chemical formulations that are inferior to modern mixes, so if you get the color right, chances are you can safely use a modern paint for better results.
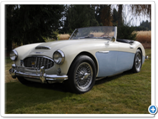
One error is to assume that everything in the drivetrain was originally painted the same color. You may know that your Austin used a particular shade of aphid green, or that your Ford V-8 was painted in traditional Ford blue, but how about other parts? Also, does your car have a racing history or other custom pedigree that you might want to maintain?
The fact is, many automakers painted or received some components in contrasting colors, or painted various components in basic black, or even left some parts unpainted. The careful restorer will know these answers before paint hits any metal. For example, my MGA roadster had a black cooling fan since at least 1973, but in the process of restoration I discovered that this part was painted a cheerful daisy yellow when it left the factory. I lost points at several shows until a kind soul pointed out this oversight! My MGA engine block was correctly painted in a nice deep shade of crimson, while the generator was always painted black. The rear axle was also painted black, and the aluminum casing of the transmission was left unpainted in its natural tone.
If no restoration manual exists for your car, turn to your club or the national club for your make and model. They will know the correct answers, and will probably recommend a brand and shade of paint that’s just right. If all else fails, look at as many cars in person, and photos on the Internet, as you can, and note the most common paint schemes. Remember, even if the color matches exactly, you need to be sure the paint will stand up to the temperature extremes in your engine compartment!
One product getting more use all the time is POR-15. Especially for parts like rear axle housings, you can’t go wrong with the hard and tough protection you get from this product, and it costs far less than having large parts powder coated.
When it’s time to paint, you have to mask your engine as carefully as any other part of your car. Take off anything you don’t want to paint and carefully use your masking tape, plastic kitchen wrap, aluminum foil, and clean shop rags to stuff and cover all mating surfaces, holes for cooling, oil, spark plugs, and any other orifices on your engine.
 |
|
Hint... |
|
Keep an old set of spark plugs around and insert them before you paint. When you’re done, just remove the painted plugs and discard, and replace them with nice new plugs.
|
When it comes to components that can be painted black, high-temperature Barbecue black is a good choice. This will stand up to the heat in your engine bay and is available in both flat and gloss formulations. Use several coats for the driveshaft and rear axle, as these are subject to a lot of water, dust, and grit as you drive.
Painting your engine and drivetrain is something that you really want to do only once. If you have to do this job over, it will involve stripping and removing your engine, with all the attendant danger to the rest of your restoration, and it’s just no fun at all. You really want to get this job done right the first time.
|
 |
DO |
- Carefully clean every part before painting
- Mask all areas that should not be painted
- Use a high-quality paint product
- Keep some spare paint around for touch-up
|
 |
DON’T |
- Don’t use an approximate color match on a good restoration
- Don’t decide that black is always a good color
- Don’t get paint on bearings and mating surfaces
|
|
|
When I disassembled the Popular Restorations feature car, I took the engine to Portland Engine Rebuilders, the transmission to Majhor Murray Ltd. auto repair, and the driveshaft and rear end to my home garage. The chassis and much of the suspension went to the powder coater.
While the rebuilders did their work I started scraping the 60-year-old rust and encrusted grease from the rear end. I tried a number of cleaners and rust removers and finally gave up. I disassembled the rear end and took the housing to the powder coater and the drive shaft to DriveLine Service who painted the drive shaft black.

To be honest, I wasn’t looking forward to painting the rear end myself. I wanted a tough coating and was initially planning on using POR-15. I like its durable, hard finish but on tubular-shaped parts it would slowly sag to the bottom before setting up even though I applied thin coats. Possibly my garage temperature wasn’t arm enough. The other thing I noticed was that despite stirring, not shaking, as directed, the POR-15 finish ended up with a lot of tiny bubbles which is not the look I wanted for the housing. Maybe these problems don’t occur when POR-15 is sprayed on. However, I figured it would be fine for the third member so I applied the three-step POR-15 process to it and a lot of smaller parts: first the Marine Clean cleaner, then the Metal Ready etching solution, and finally the POR-15 itself.
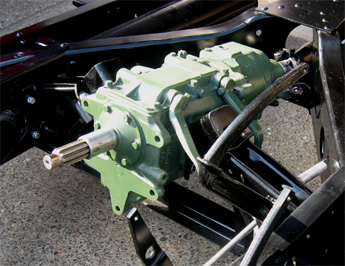
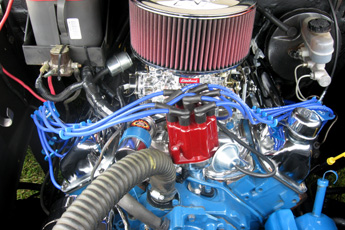
I ordered Packard Green engine paint in spray cans from Bill Hirsch Automotive and gave one can to the transmission rebuilder who painted it as part of the rebuild.
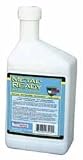
The engine was another story. By the time I got around to painting it the sheet metal had started to rust. Naval jelly worked well on the rust and, as suggested by Portland Engine Rebuilders, I sprayed the block with brake cleaner. The brake cleaner was pretty fumy but it did a good job removing the oil and grease films.
Next I sprayed the engine with self-etching primer and then with Packard Green spray paint.
|
|
|
Jim Graf, Owner
3075 SW 234th Ave # 105
Hillsboro, OR 97123
(503) 640-2004
PR: What does a restorer need to know about paint products to use on an engine or axle housing? What has the right color, lasts a long time, and looks good over time?
QP: We recommend POR-15. They carry 20 different colors for this purpose, including all the most popular colors for engines. You can get the older stuff, like Buick Green from 1953 to 1965, even the MG stuff. They’ve got their own process where you go with their Marine Clean first, then Metal Ready to etch it, then you go right over it with their engine enamel. You can brush it on or spray it.
PR: But what if it’s a rare car that requires a rare color? What sort of paints should I use then?
QP: We’d use a product called Delstar Acrylic Enamel for a custom color match. It’s got good chemical resistance if you use the hardener in it. You will have to spray it, though. But you can paint the whole block and the intake manifold and everything except the exhaust. It’s what we used all the time before POR-15.
PR: What about the spray can high-heat engine paint products - are they OK to use?
QP: They are OK to use. You won’t get the longevity out of them, but they’re not a bad way to go. They do what they’re supposed to do.
PR: How many coats should someone use on these parts?
QP: Two to three coats for full coverage. If you’re painting a part that gets a lot of abuse, such as a rear axle, I would really lean towards the POR-15. It’s like porcelain.
PR: Any other advice?
QP: You have to follow the directions. You can’t just sand and then put POR-15 on it. You have to go through the steps. If people follow the directions, I’ve never had a problem with it.
|
| Click on any item below for more details at Amazon.com |
|

|
|
Tom Monroe
Engine Builder's Handbook
HP Trade, Paperback, 1996-08-01 |
|
All of the information in this valuable companion guide is presented in easy to understand terms . It is packed with general tips, techniques, and procedures that can be applied to all types of engine building, whether for muscle cars, classics, hot rods, powerboats or all-out race cars.
|
|
POR-15
MARINE CLEAN - QUART
|
|
It cleans and degreases in one application without leaving residues or noxious fumes. Use it to clean canvas, vinyl, nylon, holding tanks, grease traps, auto parts and more.
Use this cleaner for the first step of the POR-15 preparation procedure.
|
|
POR-15
POR-15 BLACK SEMI-GLOSS RUST PREVENTIVE PAINT - QUART
|
|
Dries to an incredible rock-hard, non-porous finish that won’t chip, crack, or peel. Prevents rust from recurring by protecting metal from further exposure to moisture. Use it to coat rusty frames, floor pans, farm equipment, marine equipment, or even a heavily corroded battery tray.
Use Marine Clean and Metal Ready cleaners before applying POR-15.
|
|
|
DupliColor.com has over 20 “how to” videos showing how to apply their various coating products.
|
|
|